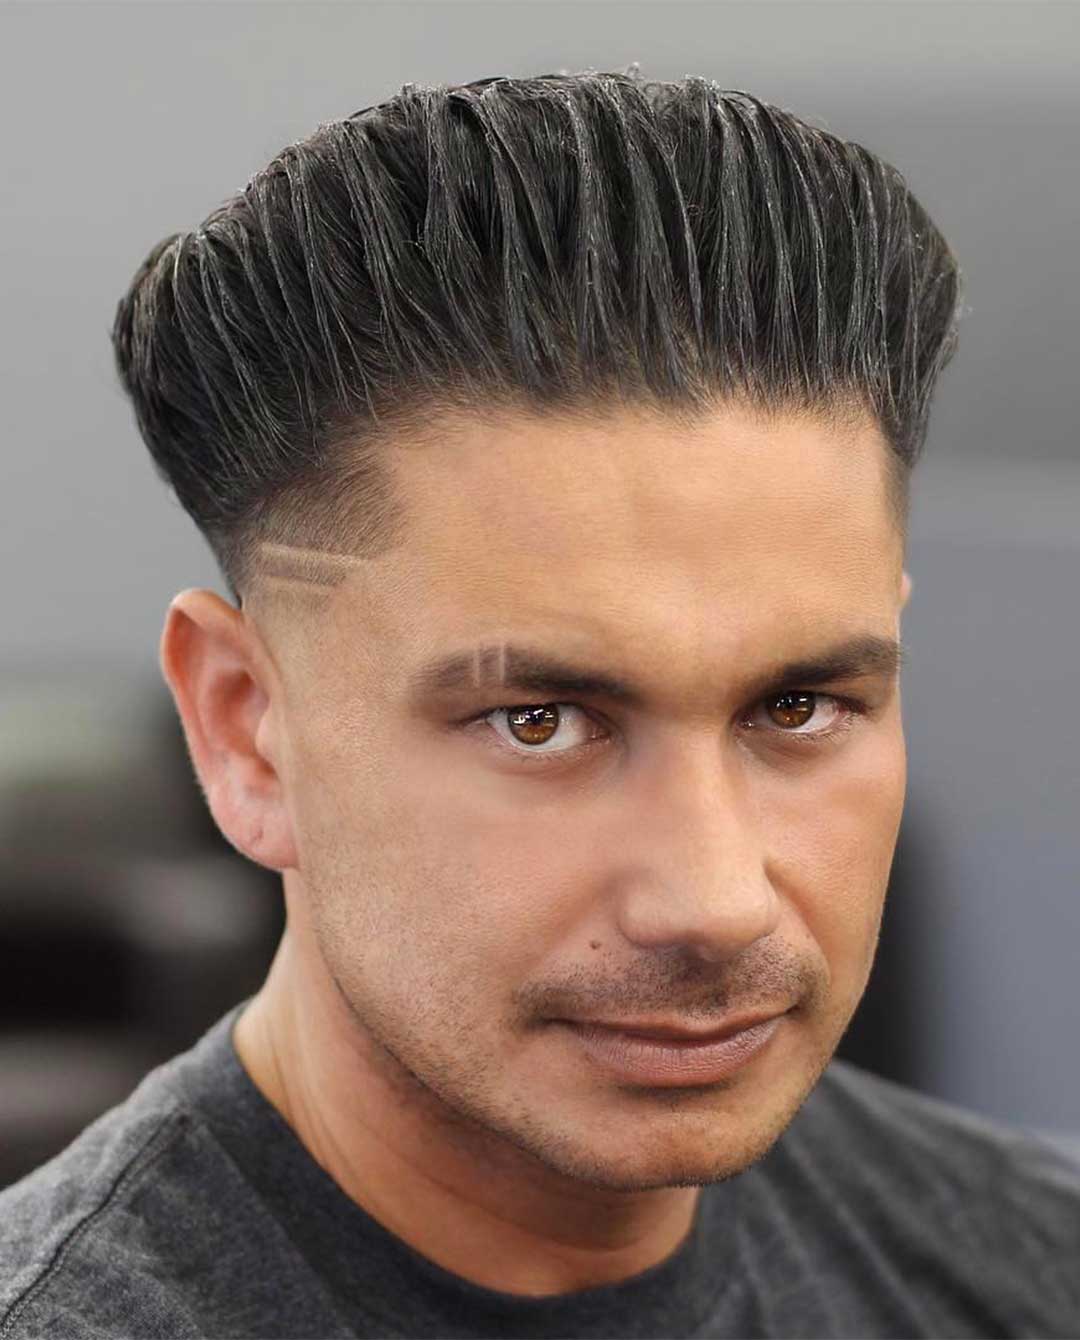
Mastering The Blowout Taper For Sleek, Voluminous Straight Hair
Have you ever looked at pictures of people with straight hair that just seems to float, full of life and bounce, yet still perfectly smooth? That, my friend, is often the magic of a well-done blowout, especially when paired with a thoughtful taper. It’s your hair, but way, way better, as my text puts it, offering a look that feels both effortless and incredibly polished. This particular style for straight strands can truly change how your hair behaves, giving it a body and a lovely shape it might not naturally possess.
For so many people with straight hair, a common wish is to add a bit of oomph, a touch of lift that makes the style look more dynamic. Flatness can be a real struggle, and achieving that salon-fresh feeling at home sometimes seems like a faraway dream. That's where understanding the combined art of the blowout and the taper for straight hair comes into play. It’s a technique that allows you to sculpt your hair using just heat and air, giving it that sought-after smooth, shiny appearance with plenty of volume where you want it most, you know?
This article will show you how to blow out hair at home, focusing on how to get that beautiful tapered effect on straight strands. We’ll explore what makes this style so special, the tools you'll need, and a step-by-step guide to help you achieve a look that feels both luxurious and completely within your reach. So, if you're ready to transform your straight hair into something truly remarkable, keep reading, because this could be just the thing you've been looking for, really.
- Is Chappell Roan Gay
- Larry Bird Wife
- Was Kamala Harris Ever Married Before
- Taylor Frankie Paul Ex Husband
- Jeffrey Jones Beetlejuice Sequel
Table of Contents
- What is a Blowout for Hair?
- Understanding the Taper in Hair Styling
- The Synergy: Blowout Taper on Straight Hair
- Why Straight Hair Loves This Look
- Getting Your Straight Hair Ready for the Blowout Taper
- The Importance of a Good Wash and Condition
- Picking the Right Products for Your Straight Hair
- Your Step-by-Step Guide to a Stunning Blowout Taper
- Initial Drying and Sectioning
- Choosing Your Styling Brush
- Techniques for Adding Volume and Smoothness
- Crafting the Tapered Shape
- Locking in Your Look
- Essential Tools for Your Blowout Taper
- Making Your Blowout Taper Last Longer
- Common Pitfalls to Steer Clear Of
- Frequently Asked Questions About Blowout Taper Straight Hair
What is a Blowout for Hair?
When we talk about a "blowout" in the world of hair, we're not referring to a sudden bursting tire or an uncontrolled escape of oil, as my text also mentions. Instead, it's a unique way to style your hair using only heat and air from a hair dryer to create smooth, shiny tresses with plenty of volume. It's an art form, really, that has been around for decades, but its definition has definitely evolved with the rise of specialized blow dry bars and varies quite a bit depending on the salon.
A good blowout is all about transforming your hair from wet to wonderfully styled, giving it a sleek finish, a beautiful body, and a natural movement. It's a method that relies on tension and heat to smooth the hair cuticle, which is that outer layer of your hair strands. When done correctly, this process makes your hair incredibly reflective and soft to the touch. It’s about more than just drying; it’s about shaping and refining your hair’s natural texture, or perhaps even giving straight hair a completely new personality, if you will.
The core of a blowout involves using a round brush and a blow dryer, moving them together in a coordinated dance to lift the roots, smooth the mid-lengths, and polish the ends. This technique can reduce frizz significantly and add a lovely bounce that lasts for days. It’s a fantastic option for anyone wanting to look put-together without resorting to flat irons or curling wands, which can sometimes feel a bit harsh on the hair. So, it's a gentle yet very effective way to get a polished style.
Understanding the Taper in Hair Styling
Now, when we add "taper" to the mix, especially with straight hair, we're talking about a subtle, gradual reduction in length or thickness. Think of it like this: the hair starts out fuller or longer at one point and then slowly gets shorter or thinner as it moves down or outwards. In styling, a taper often refers to how the hair is cut or shaped to create a specific silhouette, making it appear less blocky and more flowing. It's a way of adding a graceful shape to the hair, actually.
For straight hair, a taper can be incredibly flattering because it prevents the hair from looking too heavy or flat at the ends. It can involve subtle layers that blend seamlessly, or a slight shortening around the face or at the very ends of the hair to create a softer, more dynamic line. This shaping helps the hair move better and allows for more styling versatility. It’s not about drastic steps; it’s about gentle shaping, you know?
When you combine a taper with a blowout, you’re not just adding volume and smoothness; you’re also enhancing the hair’s inherent shape. The taper provides the foundational cut that the blowout then brings to life, highlighting the subtle changes in length and making the overall style look more intentional and sophisticated. It truly gives straight hair a more interesting and dimensional appearance, which is pretty neat.
The Synergy: Blowout Taper on Straight Hair
Bringing the blowout and the taper together for straight hair creates a truly harmonious style. A blowout, as we've discussed, gives volume and shine. A taper provides a refined shape, preventing straight hair from looking like a flat curtain. When these two concepts meet, they produce a look that is both full of life and sleekly polished. It’s a combination that truly maximizes the potential of straight strands, offering a look that feels both modern and timeless, very much so.
For straight hair, which can sometimes lack natural body, the blowout introduces that much-needed lift at the roots and a beautiful curve through the lengths. The taper, meanwhile, ensures that this added volume doesn't just sit there but flows gracefully, creating a flattering outline around the face and shoulders. This means your hair won't just be voluminous; it will also have a lovely, sculpted appearance that catches the light beautifully. It’s a clever way to add interest to otherwise uniform hair, you know?
This combined approach is particularly effective because it uses the hair’s own structure to create the desired effect, rather than relying on heavy styling products or excessive heat. The heat and air from the blowout work to smooth the hair, making it incredibly reflective, while the underlying tapered cut allows the hair to fall into a more natural, yet still shaped, position. It's a delicate balance that results in a look that feels both effortless and incredibly chic, apparently.
Why Straight Hair Loves This Look
Straight hair, while often easy to manage, can sometimes feel a bit, well, flat. It might lack the natural bounce or movement that wavy or curly textures possess. This is where the blowout taper truly shines. It’s designed to address those common straight-hair dilemmas, giving it a boost without resorting to curls or waves. It’s about enhancing what’s already there, but making it way, way better, as my text suggests, really.
One of the biggest benefits is the added volume. The blowout technique lifts the hair at the roots, creating a fullness that can last for days. This means no more hair plastered to your scalp, which is a common complaint for many with straight strands. The volume isn't just at the top; it extends through the mid-lengths, giving the hair a more substantial feel and appearance. It's a very welcome change for many, you know?
Another advantage is the incredible smoothness and shine. The controlled heat and tension from the blow dryer seal the hair cuticle, making each strand incredibly smooth and reflective. This dramatically reduces frizz and enhances the hair's natural luster, giving it a healthy, polished look. The taper then ensures that this sleekness doesn't look rigid but rather flows beautifully, adding a subtle shape that frames the face wonderfully. It’s a pretty smart way to make straight hair look its absolute best, honestly.
Getting Your Straight Hair Ready for the Blowout Taper
The secret to a fantastic blowout taper on straight hair starts long before you even pick up your hair dryer. Preparation is key, and it truly makes all the difference in how your final style turns out and how long it lasts. Think of it as laying the groundwork for a masterpiece; a good foundation means a stronger, more beautiful result, you know?
The Importance of a Good Wash and Condition
The experience of a great blowout, as my text points out, includes a full shampoo and conditioning. This isn't just about cleanliness; it's about setting the stage for smooth, manageable hair. You want to start with hair that is thoroughly clean and free of any product buildup that could weigh it down. Use a clarifying shampoo if your hair feels heavy or dull, perhaps once a week, to really get rid of any residue.
Following up with a good conditioner is absolutely crucial, especially for straight hair. Choose a conditioner that provides moisture without being too heavy. Focus on the mid-lengths and ends, as these areas tend to be drier and can benefit most from the hydration. Rinse your hair thoroughly to ensure no conditioner is left behind, as this can make your hair feel greasy or heavy once dried. It’s a simple step, yet very effective, you know?
For those with very fine straight hair, consider a volumizing shampoo and conditioner. These products are formulated to add body and lift without weighing your hair down. Remember, the goal is to create a clean, supple canvas for your blowout taper, so take your time with this initial step. It really does make a significant impact on the final outcome, you see.
Picking the Right Products for Your Straight Hair
Once your hair is clean, the right styling products will act as your allies in achieving that perfect blowout taper. These products help protect your hair from heat, add volume, reduce frizz, and give your style holding power. It’s about choosing products that complement your hair type and the look you're going for, obviously.
First up, a heat protectant is non-negotiable. Applying a heat protectant spray or cream to damp hair creates a barrier against the high temperatures of your blow dryer, helping to prevent damage and maintain hair health. This is a very important step, really, for keeping your strands looking their best over time.
Next, consider a volumizing mousse or spray, especially if your straight hair tends to be on the flatter side. Apply this product primarily at the roots to give them that much-needed lift. For added smoothness and shine, a lightweight smoothing serum or oil can be applied sparingly to the mid-lengths and ends. Be careful not to use too much, as straight hair can easily look greasy if overloaded with product. It’s a fine balance, but very worth it.
Finally, a light hold hairspray can be used at the very end to set your style. This helps to keep the volume and shape of your blowout taper intact throughout the day. Remember, less is often more with straight hair products; you want to enhance, not weigh down, your lovely style. So, pick wisely, you know?
Your Step-by-Step Guide to a Stunning Blowout Taper
Now for the fun part: bringing your blowout taper to life! This process involves a bit of technique, but with practice, you'll find your rhythm and be able to create this beautiful style with ease. It's about working with your hair, guiding it into the shape you want, you know?
Initial Drying and Sectioning
After washing and applying your products, gently towel-dry your hair until it's about 60-70% dry. This initial rough drying helps speed up the process and reduces the amount of direct heat exposure your hair receives. Use your fingers to gently lift the roots as you rough dry, encouraging some natural volume from the start. It’s a quick step that saves time and protects your hair, really.
Once your hair is damp, it's time to section it. This makes the blowout process much more manageable and ensures every part of your hair gets proper attention. Use clips to divide your hair into four to six sections: two on each side, a top section, and a back section. Starting at the nape of your neck and working your way up is usually the easiest method. This systematic approach makes a big difference, you know?
Choosing Your Styling Brush
The type of brush you use plays a significant role in the outcome of your blowout taper. For straight hair, a round brush is your best friend. The size of the brush matters: a larger barrel brush will give you more volume and a smoother, softer bend, while a smaller barrel can create more defined curves or waves, if that's what you're aiming for. For a classic voluminous blowout taper, a medium to large round brush is generally ideal, apparently.
Boar bristles or a mix of boar and nylon bristles are often preferred because they grip the hair well, providing tension for smoothing and shining, without snagging. This tension is crucial for getting that sleek, polished finish. A good brush feels comfortable in your hand and glides through your hair without pulling. It’s a very important tool in your kit, you see.
Techniques for Adding Volume and Smoothness
With your hair sectioned and your brush ready, begin blow drying each section, starting from the bottom layers. Place your round brush under a section of hair at the roots, lifting upwards as you direct the airflow from your blow dryer down the hair shaft. This motion helps to lift the roots and smooth the cuticle. Always point the nozzle of your dryer downwards to encourage smoothness and shine. It’s a simple trick that works wonders, you know?
As you pull the brush through the hair, follow it with the dryer, maintaining constant tension. For maximum volume, over-direct the hair by pulling it in the opposite direction from where it will naturally fall. For example, to lift the hair on the left side, pull it towards the right as you dry. Repeat this motion until the section is completely dry and smooth. This technique really helps to build that body, you know?
When you reach the ends, wrap the hair around the brush and give it a slight curl under or out, depending on the desired taper effect. Hold the brush in place for a few seconds with the heat on, then hit it with a cool shot from your dryer to set the shape. This cool shot is like hairspray in air form, helping to lock in the style and add shine. It’s a very effective step, really.
Crafting the Tapered Shape
To achieve the tapered look, pay special attention to how you dry and shape the layers around your face and at the ends of your hair. If your hair has pre-existing layers, the blowout will enhance them, making them appear softer and more blended. For hair that is mostly one length, you can still create the illusion of a taper by how you style the ends.
Around the face, use your round brush to gently curve the hair inwards or outwards, depending on what flatters your face shape. You want a soft, flowing line, not a harsh curl. For the ends of your hair, particularly if they are cut with a slight taper, use your brush to smooth them down and slightly under, creating a gentle, polished curve. This helps the hair look less blunt and more refined, you know?
The idea is to create a gradual decrease in visual weight, making the hair feel lighter and more dynamic. The blowout enhances the movement and flow that the taper provides, making the entire style cohesive and elegant. It’s about creating a soft, sculpted finish that looks natural, yet very styled, apparently.
Locking in Your Look
Once all sections are dry and styled, give your entire head a final cool shot from your blow dryer to really set the style and boost shine. You can also lightly mist with a flexible hold hairspray. Remember, a light touch is key here; you don't want to weigh down all that beautiful volume you just created. Just a fine mist will do the trick, really.
Gently run your fingers through your hair to break up any stiffness and encourage natural movement. Avoid brushing too much after the blowout, as this can flatten the volume. A light shake of the head or a gentle finger-comb is usually enough to perfect the look. It’s about letting the hair settle into its lovely new shape, you know?
Essential Tools for Your Blowout Taper
Having the right tools makes the blowout taper process much smoother and more effective. You don't need a salon's worth of equipment, just a few key items that will help you achieve that professional finish at home. These are your allies in getting that sleek, voluminous look, you know?
- High-Quality Blow Dryer: Look for a dryer with at least 1875 watts for efficient drying and a cool shot button. A concentrator nozzle is also essential, as it directs the airflow precisely where you want it, helping to smooth the cuticle and reduce frizz. It’s a very important piece of equipment, really.
- Round Brushes: As mentioned, a medium to large round brush is ideal for most straight hair types. Consider having a couple of sizes on hand for different effects or sections of your hair. The bristles should be firm enough to create tension but gentle on your strands.
- Hair Clips: Sectioning clips are a must-have for keeping your hair organized and out of the way as you work through each section. Butterfly clips or duckbill clips work wonderfully for this purpose. They make the process so much easier, you know?
- Heat Protectant: This is non-negotiable for safeguarding your hair from heat damage.
- Volumizing Mousse or Spray: To give that much-needed lift at the roots.
- Lightweight Smoothing Serum or Oil: For added shine and frizz control, especially on the ends.
- Flexible Hold Hairspray: To set your finished style without making it stiff.
Having these items ready before you start will ensure a seamless styling experience and a much better outcome. It’s like having all your ingredients prepped before you start cooking, you know?
Making Your Blowout Taper Last Longer
You’ve put in the effort to create a beautiful blowout taper, so naturally, you want it to last as long as possible! With a few simple tricks, you can extend the life of your style for days, keeping that volume and smoothness intact. It’s about protecting your hard work, you see.
- Sleep Smart: Before bed, gather your hair into a loose bun on top of your head, often called a "pineapple." Use a soft scrunchie or a silk hair tie to avoid kinks. Sleeping on a silk pillowcase can also help reduce friction and prevent frizz, keeping your hair smoother. This is a very effective strategy, really.
- Dry Shampoo is Your Friend: On day two or three, if your roots start to look a little oily, a sprinkle of dry shampoo can work wonders. Apply it directly to your roots, let it sit for a few minutes to absorb oil, then gently massage it in or brush it out. It revives volume and freshness, you know?
- Avoid Humidity: Humidity is the arch-nemesis of a good blowout. If you're heading out on a damp or rainy day, consider using an anti-humidity spray as a final step in your styling routine. Try to avoid excessive steam in the shower by wearing a shower cap or keeping your hair out of the direct spray.
- Hands Off: The more you touch your hair, the more oils from your hands will transfer to your strands, causing it to flatten and lose its freshness. Try to resist the urge to constantly run your fingers through your beautiful blowout. It’s a simple rule, but very helpful.
- Refresh with a Blow Dryer: If your hair starts to lose its volume, you can do a quick refresh. Lightly mist your roots with a volumizing spray or a tiny bit of water, then use your round brush and blow dryer to re-lift and reshape. This can give your style a second life, you know?
By following these tips, you can enjoy your gorgeous blowout taper for several days, saving you time and effort in your daily routine. It’s about smart maintenance, really.
Common Pitfalls to Steer Clear Of
Even with the best intentions, it's easy to fall into some common traps when doing a blowout taper on straight hair. Knowing what to avoid can save you frustration and help you achieve better results. It’s about learning from others' experiences, you know?
- Over-Saturating with Product: While products are important, too much can weigh down straight hair, making it look greasy or stiff. Start with a small amount and add more only if needed. Less is often more, particularly for finer hair types. This is a very common mistake, really.
- Not Drying Hair Enough: Trying to style hair that is too wet will take forever and won't yield the best results. Aim for 60-70% dry before you start styling with the brush. This saves time and protects your hair from excessive heat exposure.
- Using Too Much Heat: High heat can damage your hair, especially straight hair which can be more prone to heat damage. Use a medium heat setting and always keep the blow dryer moving. The cool shot is for setting, not drying. Learn more about preventing heat damage to hair.
- Not Sectioning Properly: Trying to blow dry your entire head at once is a recipe for uneven drying and frizz. Proper sectioning ensures every strand gets the attention it needs for a smooth, voluminous finish. It’s a crucial organizational step, you know?
- Ignoring the Nozzle: The concentrator nozzle on your blow dryer isn't just for show. It directs the airflow, making your blowout much more effective at smoothing the cuticle and adding shine. Always use it, pointing it down the hair shaft.
- Pulling Too Hard: While tension is important, pulling too hard on your hair with the brush can cause breakage. Be firm but gentle, letting the brush and airflow do most of the work.
By being mindful of these common mistakes, you'll be well on your way to mastering the blowout taper for your straight hair. It's about refining your technique, you know?
Frequently Asked Questions About Blowout Taper Straight Hair
People often have questions when they’re trying a new hair styling technique. Here are some common queries about achieving a blowout taper on straight hair, because sometimes you just need a quick answer, you know?
What is a blowout taper?
A blowout taper for hair is a styling method that combines the volume and smoothness of a traditional blowout with the refined shaping of a tapered cut. It means using a blow dryer and brush to lift the roots and smooth the hair, while enhancing the subtle, gradual reduction in hair length or thickness that a taper provides. This creates a look that is full of body, shiny, and has a lovely, flowing shape, which is pretty neat.
Can you do a blowout on straight hair?
Absolutely! A blowout is incredibly effective on straight hair. In fact, it's one of the best ways to add significant volume, shine, and a polished finish to straight strands that might otherwise appear flat or lifeless. It uses heat and air to transform the hair, giving it bounce and movement without needing to add curls or waves. So, yes, it’s a very popular choice for straight hair, you know?
How do you get volume with a blowout on straight hair?
To get volume with a blowout on straight hair, focus on lifting the roots as you dry. Use a round brush to pull sections of hair upwards and away from your scalp, directing the airflow from your blow dryer directly at the roots. Over-directing the hair (pulling it in the opposite direction from where it will fall) also helps. Finishing each section
- Sophie Rain
- Stevie Wonder Children
- Kat Timpf Husband
- Jordan Chiles Fashion Week Dress
- Selena Gomez Engagement Ring

Unlocking The Style: The Blowout Taper Fade

Pin by Rebecca A. on Isaiah Hair | Taper haircut men, Mens haircuts
Blowout Haircut: 25+ Modern Blowout Fade and Taper Hairstyles
