How To Read Tape Measure Measurements: Your Simple Guide For Today
Knowing how to read tape measure measurements is, quite frankly, a really handy skill to pick up. Whether you are hanging a picture, building something big, or just trying to figure out if that new couch will fit, getting your measurements right truly matters. A small mistake can lead to big problems, like needing to buy more materials or having things just not line up. It can feel a little confusing at first, looking at all those lines and numbers, but it truly is simpler than it seems.
For many folks, that tape measure can look like a secret code, full of tiny marks and different lengths. You might feel a bit lost trying to figure out what each line means, especially when you are trying to be super precise. This can lead to guesswork, and well, guesswork is not really what you want when you are trying to make things fit or build something sturdy. There is a way to make sense of it all, so you can measure with confidence, you know?
This guide is here to help you get comfortable with your tape measure, making all those lines make perfect sense. Just like having an open book can help you learn new things, understanding your tape measure can open up a world of possibilities for your projects. We will break down what each mark means, both for inches and for centimeters, so you can measure anything with ease. By the end, you will be able to read any tape measure like a pro, and that is a pretty useful thing to be able to do, right?
- David Corenswet Superman
- Luke Grimes Wife
- Jennifer Aniston Oil
- Was Kamala Harris Ever Married Before
- Anne Princess Royal
Table of Contents
- The Basics of Your Tape Measure
- Decoding Imperial Measurements
- Making Sense of Metric Measurements
- Practical Tips for Accurate Measuring
- FAQs About Tape Measure Readings
- Putting Your New Skills to Use
The Basics of Your Tape Measure
Before you start measuring, it is helpful to know a little bit about the tool itself. Tape measures come in various lengths and styles, but their core parts are pretty much the same. Knowing these bits can really help you get started, you know?
Anatomy of a Tape Measure
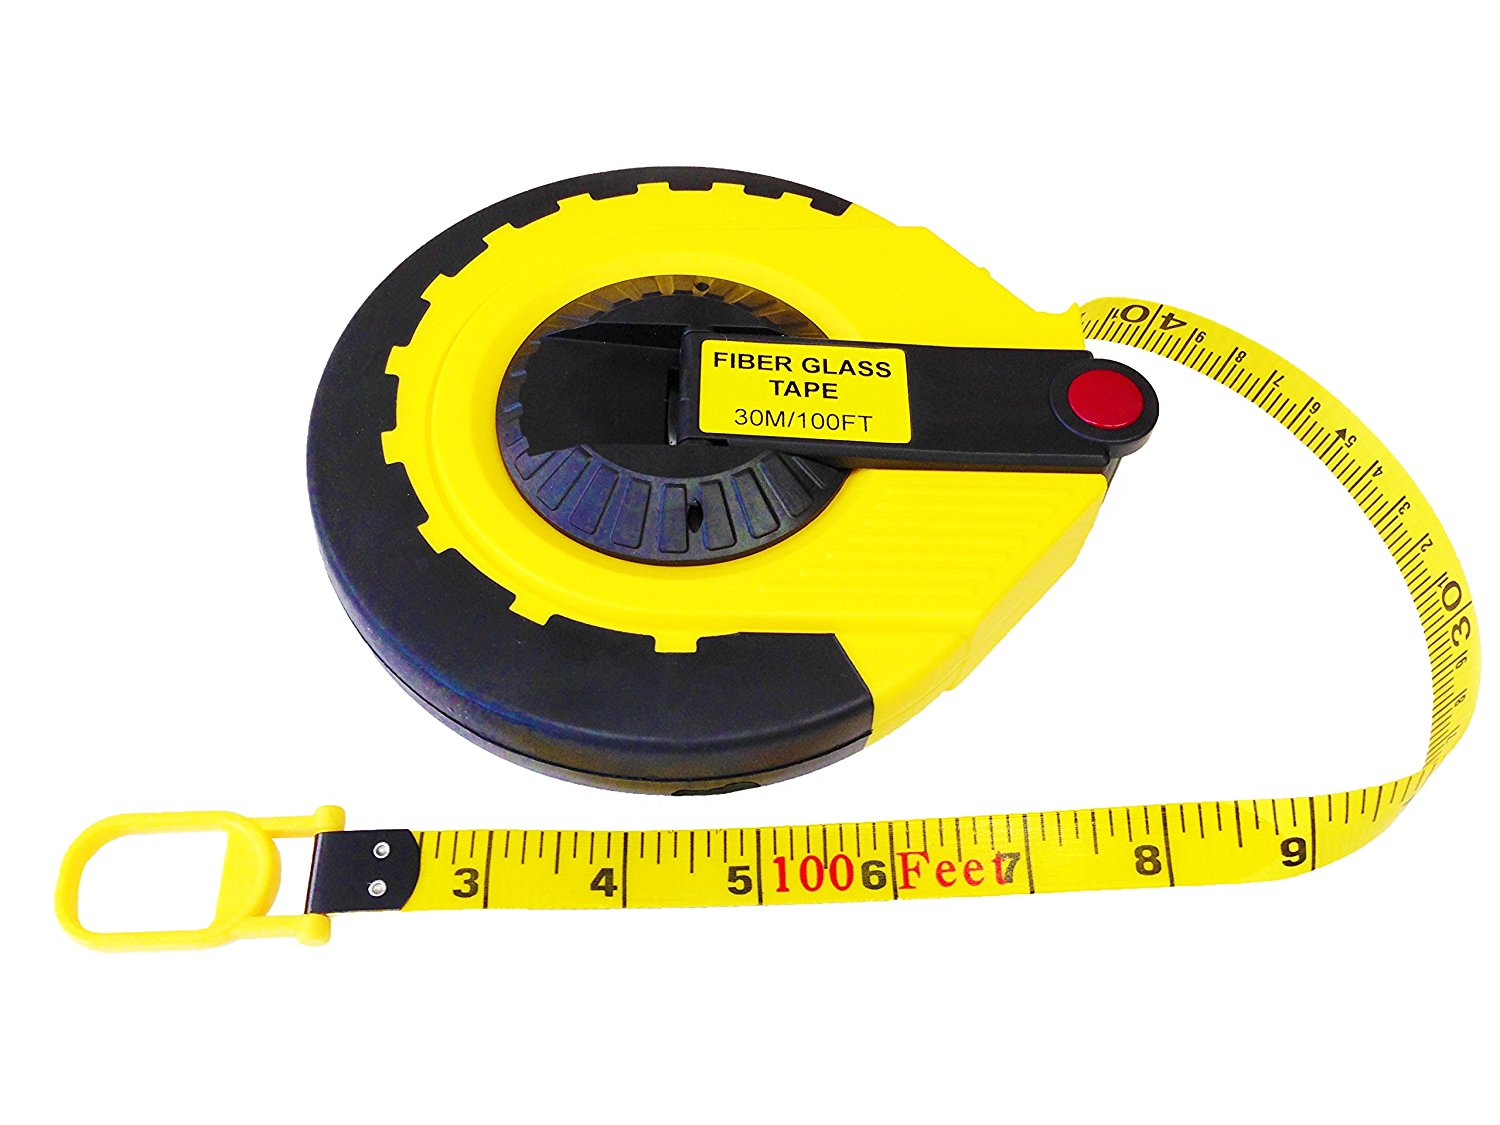
Most tape measures have a metal or fiberglass strip that pulls out from a case. This strip has markings on it that show length. The end of the tape usually has a small metal hook, and this hook is actually pretty clever. It moves a little bit, so it can give you an accurate measurement whether you are hooking it over an edge or pushing it against a surface. This little bit of movement helps you get a true zero point, which is really important for getting things just right.
The case itself often has a lock button to hold the tape in place once you have pulled it out to the length you need. This is super helpful when you are trying to mark a spot or if you need to carry a measurement over to another piece of material. Some tape measures also have a belt clip, which makes them easy to carry around when you are working on a project. You might also notice a small button underneath that helps retract the tape slowly, which is nice so it does not snap back too fast.
- Luna Sofía Miranda
- Brad Pitt And Angelina Jolie
- Sal Vulcano Wife
- Brett Cooper Husband
- Hugh Jackman Sutton Foster
Imperial vs. Metric Systems
Tape measures typically show measurements in one of two systems, or sometimes both. The imperial system uses feet and inches, which is what many people in the United States are used to. Each inch is then broken down into smaller parts, like halves, quarters, and sixteenths. This can feel a bit fiddly at first, so it is something to get used to.
The metric system, on the other hand, uses meters, centimeters, and millimeters. This system is based on tens, which makes it, in some ways, a little easier to work with once you get the hang of it. Most of the world uses the metric system, so if you are working on something that came from another country, you might see these markings more often. It is good to know both, just in case, you know?
Decoding Imperial Measurements
When you are looking at an imperial tape measure, you will see a lot of lines, some long, some short. Each line means something specific, and once you get the pattern, it will be much clearer. It is almost like learning a new language, but for numbers, so it is not too bad.
Understanding Inches and Feet
The biggest numbers on your tape measure usually represent whole inches. These are typically the longest lines, and they often have the numbers printed right next to them. For example, you will see 1, 2, 3, and so on. Every 12 inches, you will often see a special mark, sometimes a different color or a larger number, indicating a foot. So, the 12-inch mark is also 1 foot, the 24-inch mark is 2 feet, and so on. This helps you keep track of longer lengths without having to count every single inch, which is pretty convenient.
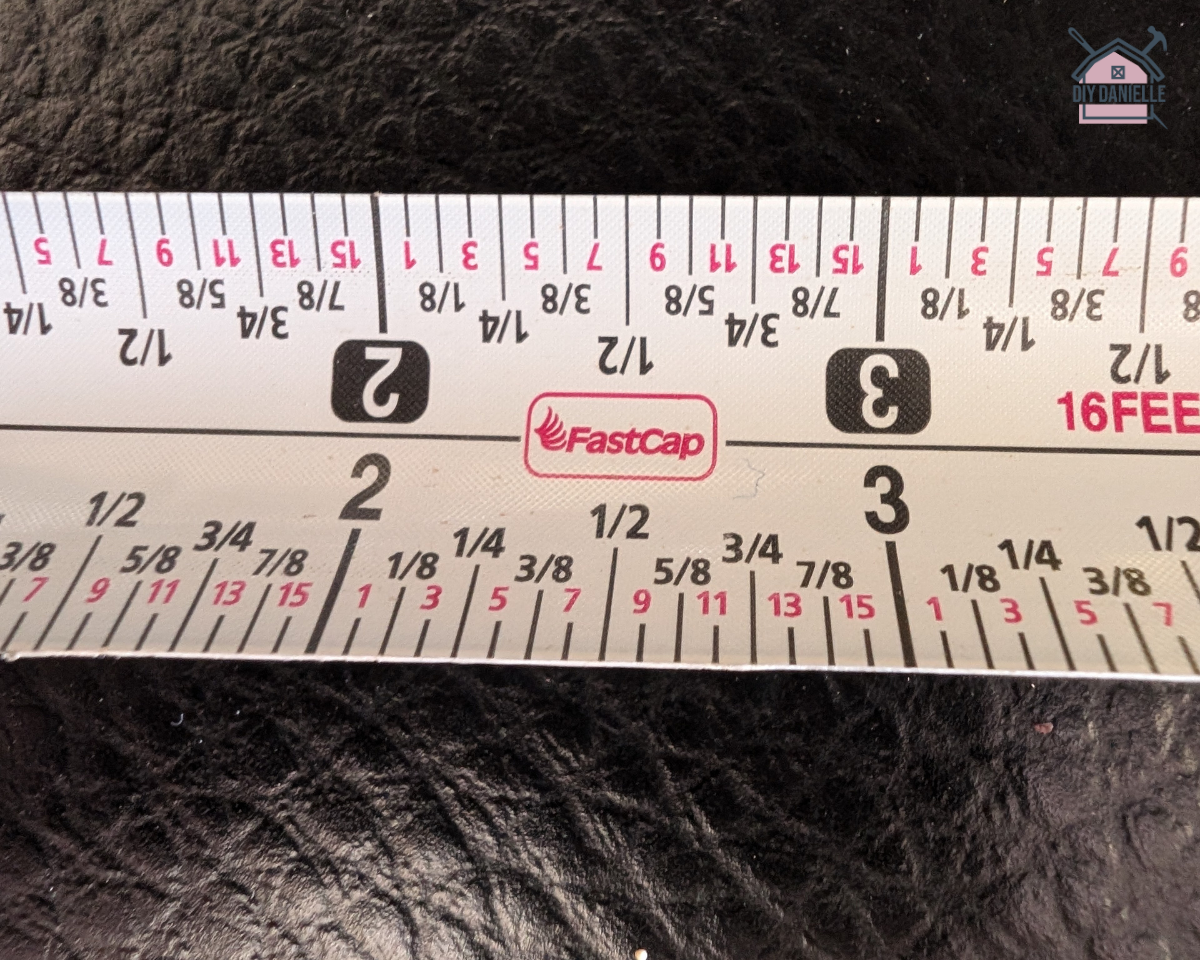
Fractions of an Inch: The Little Lines
Between each whole inch mark, you will find a series of shorter lines. These lines represent fractions of an inch. The length of the line tells you what fraction it is. The longer the line, the larger the fraction it represents. This is where people sometimes get a bit mixed up, but it is actually quite logical once you see the pattern. We will break down each common fraction, so you can really get a feel for it.
1/2 Inch Markings
The longest line between two whole inch marks is the half-inch mark. It is usually pretty easy to spot because it is significantly longer than the other fractional lines. For example, between the 1-inch mark and the 2-inch mark, the line exactly in the middle is 1 1/2 inches. This is probably the easiest fraction to spot, so that is good.
1/4 Inch Markings
Between a whole inch mark and a half-inch mark, you will find a line that is a bit shorter than the half-inch mark. These are the quarter-inch marks. So, from the 1-inch mark, the first quarter-inch line is 1 1/4 inches. The next one, which is the half-inch mark, is 1 2/4 inches (which simplifies to 1 1/2 inches). The line after that is 1 3/4 inches. This pattern repeats, so you have 1/4, 1/2, 3/4 within each inch, you know?
1/8 Inch Markings
Now, between a whole inch mark and a quarter-inch mark, or between a quarter-inch mark and a half-inch mark, you will see even shorter lines. These represent eighths of an inch. They are shorter than the quarter-inch lines. So, starting from 1 inch, you would have 1 1/8 inches, then 1 2/8 inches (which is 1 1/4 inches), then 1 3/8 inches, and so on. It is about splitting those quarter sections even further, which is pretty neat.
1/16 Inch Markings
The shortest lines on most tape measures are the sixteenth-inch marks. These are the tiny lines that fill in the gaps between the eighth-inch marks. If you need a really precise measurement, these are the lines you will be looking at. So, after 1 inch, you would have 1 1/16 inches, then 1 2/16 inches (which is 1 1/8 inches), then 1 3/16 inches, and so on. Counting these tiny lines can take a little practice, but it is definitely doable. You just need to take your time with it.
Smaller Divisions
Some tape measures, especially those used for very fine work, might even have 32nd or 64th of an inch markings. These lines are incredibly small and are usually only found on specialized tapes. For most home projects, a sixteenth-inch accuracy is more than enough. If you see lines even smaller than the sixteenths, just know they are breaking down those tiny sections even further, which is pretty wild, honestly.
Special Markings You Might See
You might notice some other marks on your tape measure that are not just about inches or feet. For example, many tapes have red marks every 16 inches. These are often used for framing, as standard wall studs are typically spaced 16 inches apart. This is a real time-saver if you are doing construction work. You might also see small black diamonds every 19.2 inches, which are for truss layout in some building practices. These special marks are like little shortcuts for specific jobs, so they are quite helpful when you know what they mean.
Making Sense of Metric Measurements
If you are working with a metric tape measure, or one that has both systems, reading it is a bit different but often feels more straightforward due to its base-10 nature. It is a system that just makes sense to many people, you know?
Centimeters and Millimeters
The main units you will see on a metric tape are centimeters (cm) and millimeters (mm). Centimeters are usually marked with larger numbers, similar to inches on an imperial tape. So, you will see 1 cm, 2 cm, 3 cm, and so on. Every 100 centimeters makes 1 meter, though most hand-held tapes do not go up to a full meter in one go. Millimeters are the smaller divisions within each centimeter. There are 10 millimeters in every centimeter. This makes conversions super easy, since you are just moving decimal points.
Reading Metric Markings
Between each centimeter mark, you will see 9 smaller lines. Each of these lines represents a millimeter. The fifth millimeter mark (the one right in the middle of a centimeter) is often a bit longer than the others, making it easier to count. So, if you are at the 5 cm mark and you go three small lines past it, that is 5.3 cm, or 53 mm. It is very direct, which is nice. For instance, a measurement might be 24 cm and 7 mm, which you would read as 24.7 cm. It is a very logical system, you see?
Practical Tips for Accurate Measuring
Reading the tape is one thing, but getting an accurate measurement every single time involves a few simple tricks. These tips can really make a difference in your projects, so they are worth remembering. It is about more than just looking at the numbers; it is about how you use the tool, you know?
Holding the Tape Correctly
When you are measuring, make sure the tape is flat against the surface you are measuring. If it is twisted or bent, your measurement will be off. For longer measurements, it can be helpful to have someone else hold the other end, or you can hook the tape onto an edge. Make sure the tape is pulled taut, but not so tight that it stretches. A little bit of tension is good, but too much can give you a slightly longer reading than you need, which is not what you want.
Avoiding Common Mistakes
One common mistake is not accounting for the thickness of the tape's end hook. Remember, that hook is designed to slide a tiny bit to give you a true zero. So, if you are hooking it over an edge, the inside of the hook is your starting point. If you are pushing it against a surface, the outside of the hook is your starting point. Another common error is reading at an angle; always read the measurement straight on, looking directly down at the tape. Reading from an angle can make the measurement appear longer or shorter than it actually is, which is called parallax error. Also, make sure you are consistent with your starting point every time. You really want to be precise here.
When to Double-Check
For any important project, it is always a good idea to measure twice, or even three times. This is especially true for cuts or placements that need to be exact. Measure, mark, and then measure again to confirm your mark. If you get different readings, measure a third time to see which one is consistent. It takes a little extra time, but it can save you a lot of frustration and wasted materials later on. It is just a good habit to get into, so that is something to think about.
FAQs About Tape Measure Readings
What do the tiny lines on a tape measure mean?
The tiny lines on a tape measure represent fractions of an inch in the imperial system, or millimeters in the metric system. In the imperial system, the shortest lines usually show sixteenths of an inch. The length of the line helps you tell what fraction it is; shorter lines mean smaller fractions. For example, the smallest lines are typically 1/16th of an inch, which is pretty small, you know?
How do you read a tape measure in inches and fractions?
To read a tape measure in inches and fractions, first find the last whole inch mark before your measurement. Then, count the number of fractional lines after that whole inch. The longest line between inches is the 1/2 inch. The next longest are 1/4 and 3/4. The slightly shorter ones are 1/8, 3/8, 5/8, and 7/8. The very shortest lines are 1/16, 3/16, 5/16, and so on. You count the small lines and put that number over 16 (or 8, 4, 2 depending on the line's length), then simplify the fraction. So, if it is past 5 inches and lands on the third shortest line after the 5, that is 5 and 3/16 inches, for example. It takes a little practice, but you will get it.
What are the red marks on some tape measures for?
The red marks you might see on some tape measures, typically every 16 inches, are for marking standard stud spacing in construction. In many building codes, wall studs are placed 16 inches apart from their centers. These red marks act as quick guides for builders and DIYers, helping them quickly locate where to place studs without needing to measure out 16 inches each time. It is a really helpful feature for framing, so it is quite useful.
Putting Your New Skills to Use
You have now got a pretty good handle on how to read tape measure measurements, whether you are dealing with inches or centimeters. This skill is truly a useful addition to your everyday knowledge, helping you tackle projects around the house or at work with more confidence. Just like learning to read a book opens up new stories, learning to read a tape measure opens up new possibilities for building and creating. For more general learning and to discover a vast collection of information, you can always explore resources like the Open Library, which offers a wide array of topics for anyone wanting to expand their personal knowledge base.
The best way to really get comfortable with your tape measure is to simply practice. Grab a tape measure and start measuring things around your home. Measure a table, a door frame, or even a book. Try measuring in both inches and centimeters if your tape has both scales. The more you use it, the more natural it will feel, and the faster you will become at reading those lines. You can learn more about accurate measuring tools on our site, and also find inspiration for your next project by checking out project ideas with measurements. Keep practicing, and you will be measuring like a pro in no time, you know?
- Vanessa Hudgens Baby
- Dove Cameron Boyfriend
- Brad Pitt Girlfriend 2024
- Denzel Washington Wife
- Movies To Stream This Weekend
How To Read A Tape Measure Efficiently And Correctly | EarlyExperts
How to Read a Tape Measure: A Guide to Accurate Measurements

How to Read a Tape Measure in Inches (FREE Cheatsheet!)
