How To Read A Tape Measure: Your Simple Guide To Accurate Projects
Learning how to read a tape measure can truly change how you approach everyday tasks and bigger projects around the house. It’s a skill that, you know, makes a lot of things easier, from putting together furniture to hanging pictures just right. Many people feel a bit lost when they first look at all those lines and numbers on a tape, and that's okay. So, we're here to help make sense of it all for you.
You might think it’s just about stretching a piece of metal, but there's a bit more to it. Knowing how to read a tape measure correctly means you can finish your projects with confidence, every single time. This guide will help you understand what all those markings mean, whether you're working with inches or centimeters, which is that, really handy to know.
We'll cover the essentials of reading a tape measure, making sure you get the most accurate measurement possible. This way, you can master basic home repairs and DIY building projects. Read on to know how to use a measuring tape like a pro, and we’ll even help you understand some tape measure features, too.
- Kylie Jenner Boyfriend
- Hugh Jackman Sutton Foster
- Mauricio Umansky Girlfriend
- William Finbar Kennedy
- Zendaya And Tom Holland Engaged
Table of Contents
- Understanding Your Tape Measure
- How to Read a Tape Measure: Step-by-Step
- Tips for Accurate Measuring
- Common Tape Measure Features
- Frequently Asked Questions (FAQs)
- Ready to Measure with Confidence?
Understanding Your Tape Measure
A standard tape measure has a hook at its end. This hook, you know, is followed by a series of markings along its length. Knowing what each part does is the first step to reading it well. It sounds easy, but knowing how to read a tape measure in both metric and imperial systems is really handy to know. Imperial, in particular, can be quite tricky in the beginning.
The Hook
The hook at the very start of your tape measure is a simple but clever part. It's there to help you catch the edge of whatever you're measuring. This part, you see, slides just a little bit. This small movement is not a flaw; it's actually for accuracy.
When you measure from an outside edge, the hook pulls in slightly. This accounts for the hook's own thickness. When you measure an inside distance, like inside a window frame, the hook pushes out. This also accounts for its thickness. This design means your zero point is always spot on, which is quite important.
The Markings
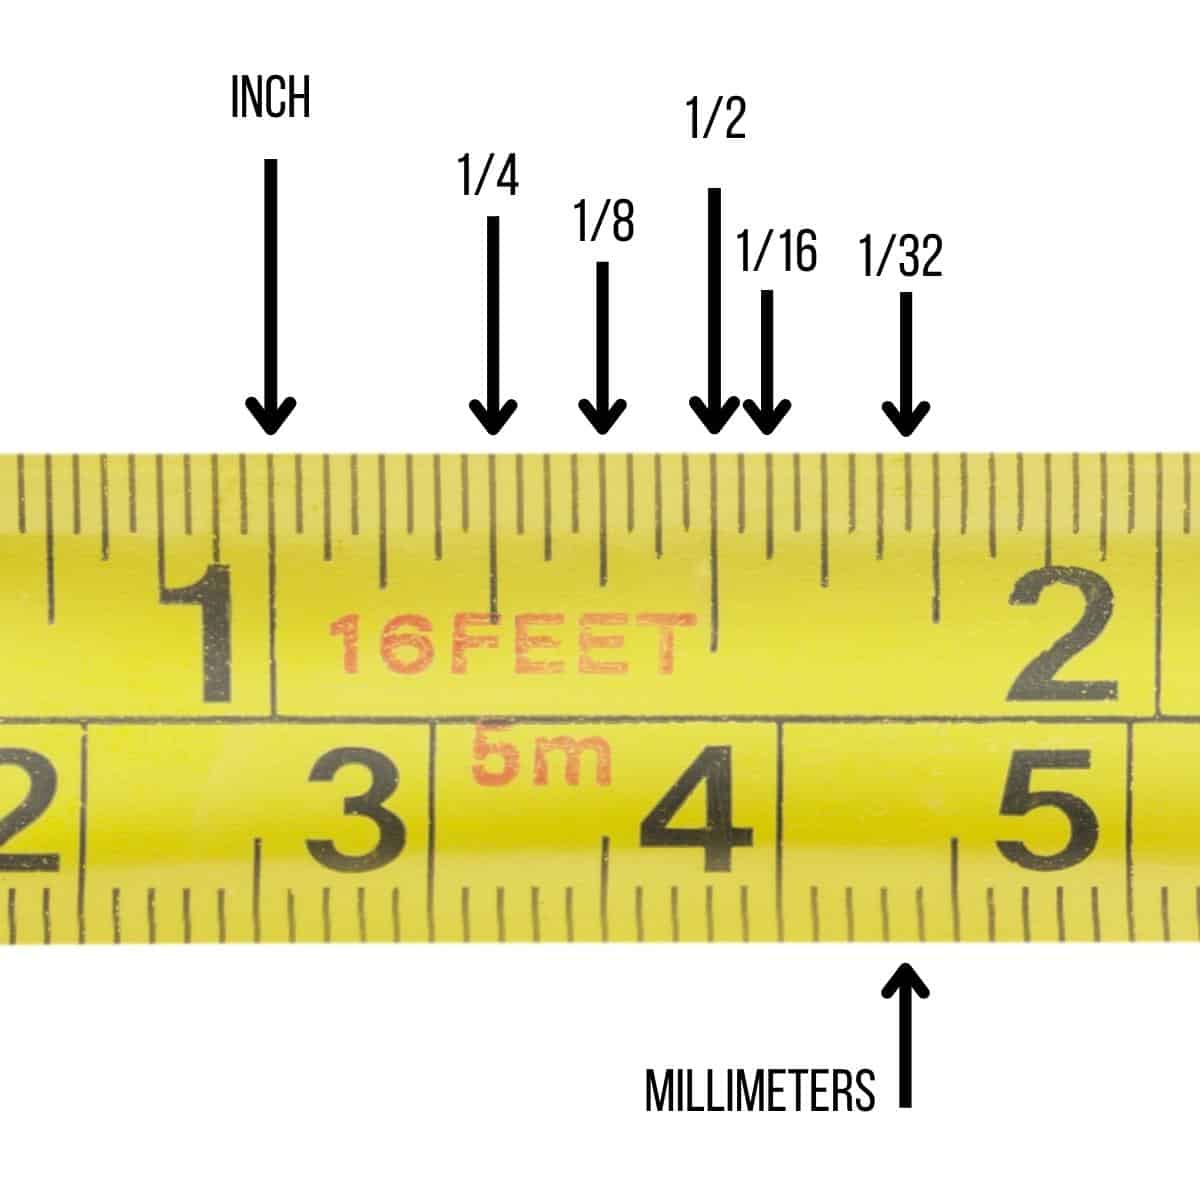
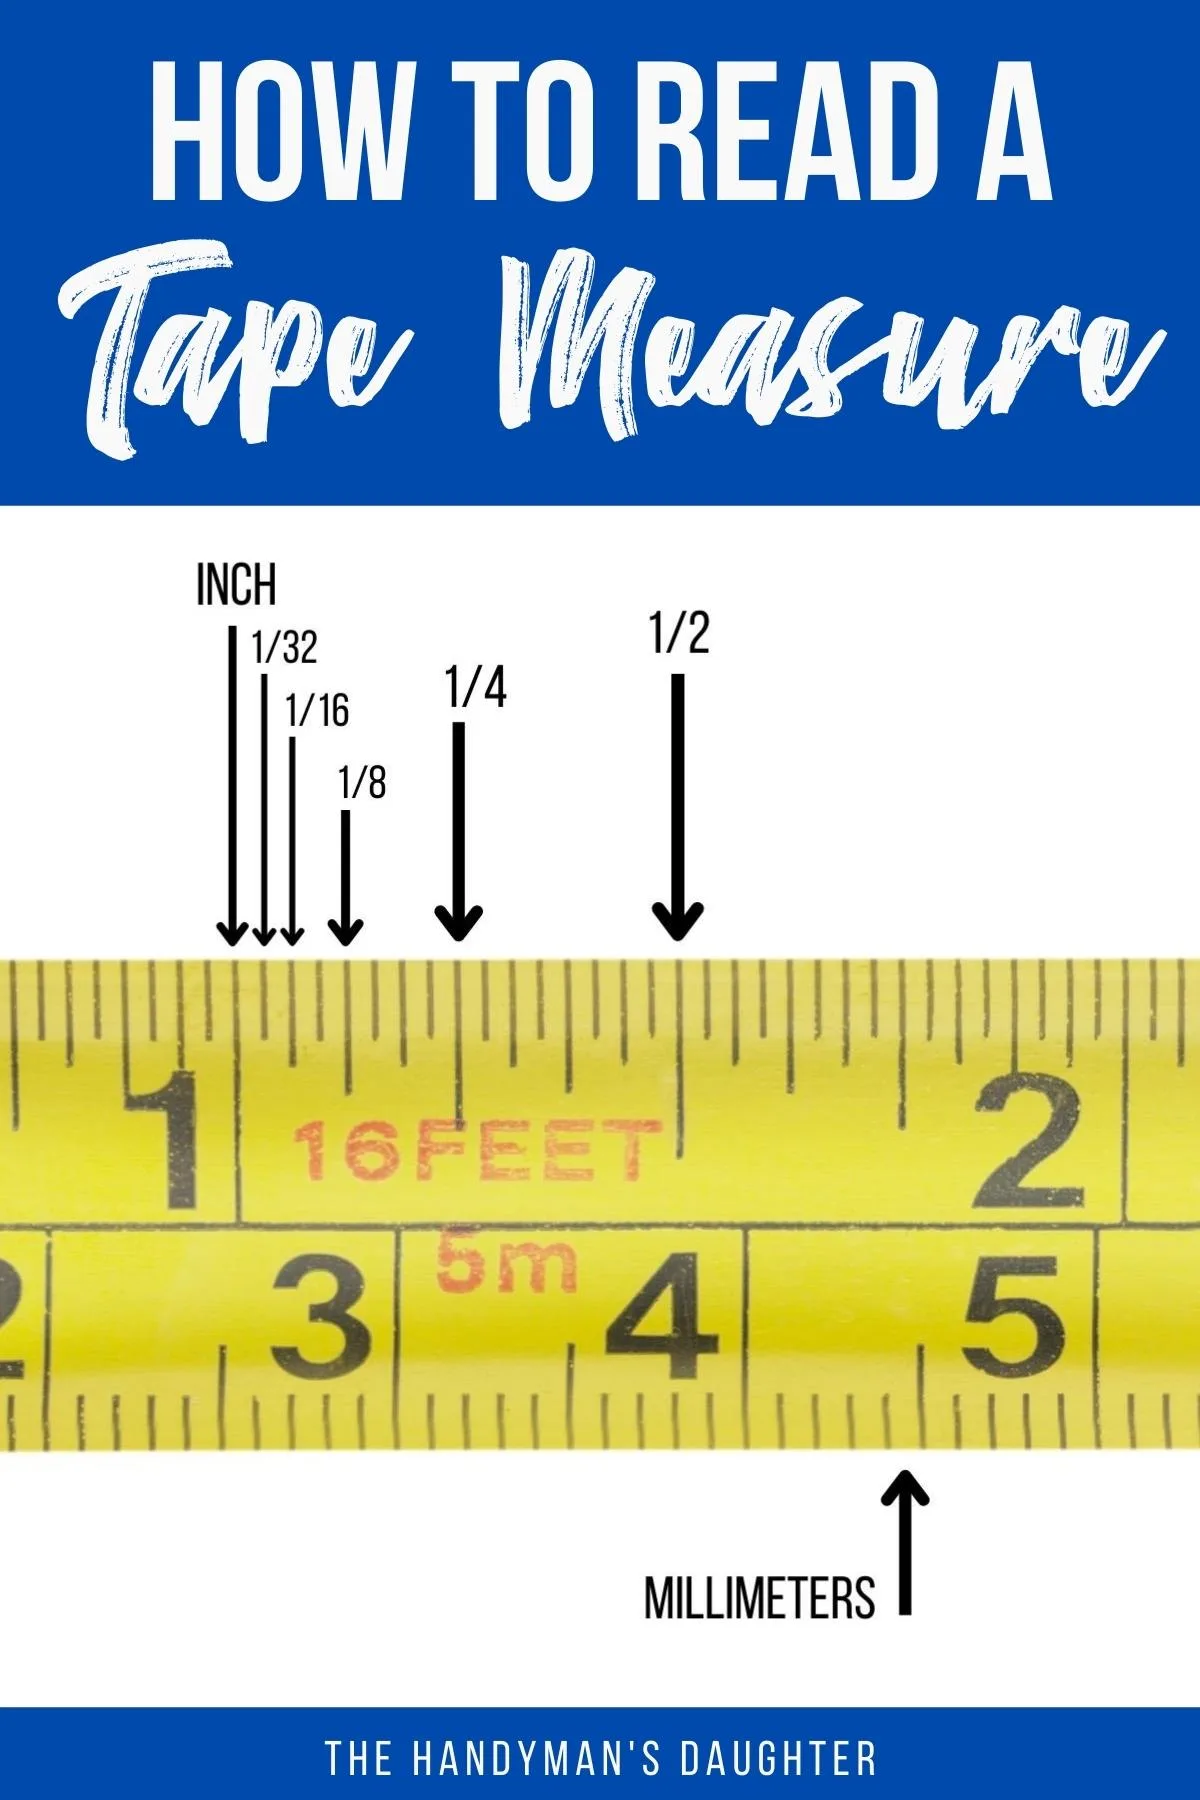
The lines on a tape measure can look a bit overwhelming at first glance. There are many of them, some long, some short, and they all mean something. I think the easiest way is by understanding and learning what the 16 markings of an inch stand for. This guide covers everything from reading a tape measure in inches to metric systems like centimeters and millimeters, too.
The Inch
The largest numbers on the tape measure, like 1, 2, 3, and so on, show full inches. These are usually marked with the longest lines. They are the main units of length in the imperial system. When you measure something, you'll first look for the full inch mark your item reaches, you know, before any smaller lines.
Fractions of an Inch
Between each full inch mark, you'll find a series of shorter lines. These lines show fractions of an inch. They get shorter as the fraction gets smaller. This is where many people get a bit confused, but it's really quite simple once you get the hang of it.
Half-inch
The half-inch mark is the longest line between two full inches. It sits right in the middle. This line means one-half (1/2) of an inch. It's usually a bit longer than the other fraction marks, which makes it easy to spot, naturally.
Quarter-inch
Between the full inch and the half-inch mark, you'll find a line that is a bit shorter than the half-inch mark. This is the quarter-inch mark. There are two of these between each inch: one at one-quarter (1/4) and another at three-quarters (3/4). They are important for getting a more precise measure, too.
Eighth-inch
The eighth-inch marks are shorter than the quarter-inch marks. There are eight of these smaller sections within each inch. You'll find them at one-eighth (1/8), three-eighths (3/8), five-eighths (5/8), and seven-eighths (7/8) of an inch. These help you get a finer reading, you know.
Sixteenth-inch
The smallest lines on most tape measures represent sixteenths of an inch. There are 16 of these tiny divisions within each full inch. These are the shortest lines, and they allow for the most precise measurements in the imperial system. Knowing what the 16 markings of an inch stand for is key to reading these well, you see.
Reading the Numbers
To read a tape measure, you first find the number next to the large tick mark that is just before your measurement point. This number tells you the full inches. For example, if your item ends past the 5 but before the 6, your measurement starts with 5 inches. This is the base of your reading, basically.
Counting the Small Marks
After finding the full inch, you then find how many small ticks past it the measurement is. You count the small lines from the last full inch mark to where your item ends. For instance, if it's past the 5-inch mark and lands on the third small line, you then need to figure out what that third line means in terms of fractions.
Metric Markings
Some tape measures, especially outside the United States, use the metric system. This system uses centimeters and millimeters. Learning how to read both metric and imperial tape measures properly is a good skill to have. It's a bit different from inches, but arguably, it's simpler for many people.
Centimeters
Centimeters are the main units in the metric system on a tape measure. They are usually marked with larger numbers, similar to inches. You'll see numbers like 10, 20, 30, which mean 10 centimeters, 20 centimeters, and so on. Each centimeter is divided into smaller units, you know.
Millimeters
Between each centimeter mark, you'll find ten smaller lines. Each of these lines represents a millimeter. So, there are 10 millimeters in every centimeter. This means if your measurement is past 25 centimeters and lands on the 7th small line, it's 25 centimeters and 7 millimeters, or 257 millimeters. This system is often seen as very straightforward, you know.
How to Read a Tape Measure: Step-by-Step
Now that you know the parts, let's go through the process of reading a tape measure. It's about combining what you see on the tape with a bit of counting. We'll break it down to the literal millimeters to ensure you get the most accurate measurement possible, every single time, you see.
Getting Started
To measure something with a tape measure, you first line the zero mark up at the edge of the item you're measuring. This is your starting point. Then, you stretch the tape all the way across the item. Try to keep the tape straight, which is really important for getting an accurate reading. A crooked tape can give you a wrong number, you know.
Reading Imperial Measurements
Reading in inches involves a bit of observation and counting. It's about finding the whole number and then adding the fraction. This method is what most DIY projects in certain regions will ask for, so it's a good one to master.
Finding the Whole Inch
First, look for the last whole inch number that your measurement passes. For example, if your mark falls after the 10 but before the 11, your measurement starts with 10 inches. This is the big number you'll write down first. It's like finding the biggest piece of a pie before you look at the smaller slices, if you will.
Identifying the Fractions
Next, count the small lines after that last whole inch mark until you reach your measurement point. Remember, each inch has 16 of these small lines. If your mark lands on the 8th small line after the 10-inch mark, that means it's 8/16 of an inch. You then simplify this fraction. 8/16 simplifies to 1/2.
Putting It All Together
Once you have your whole inch and your simplified fraction, you put them together. So, in our example, 10 inches and 1/2 inch becomes 10 1/2 inches. This is how you add the number next to the large tick with the fractional part, you know. It's a simple process once you practice it a few times.
Reading Metric Measurements
Reading metric measurements is often seen as more straightforward because it's based on tens. You just count the main units and then the smaller ones. It's very, very logical, some might say.
Finding the Centimeter
Locate the last full centimeter mark your measurement passes. These are usually the numbered lines, like 1, 2, 3, or 10, 20, 30 for larger tapes. If your mark is past the 25 cm line but before the 26 cm line, then your measurement starts with 25 centimeters. This is your base metric unit, you know.
Counting Millimeters
From that last full centimeter mark, count the small millimeter lines until you reach your measurement point. There are 10 millimeters in each centimeter. If your mark is past 25 cm and lands on the 4th small line, that means it's 4 millimeters. So, your total measurement would be 25 centimeters and 4 millimeters, which is often written as 25.4 cm or 254 mm. It’s a very direct way of reading, you see.
Tips for Accurate Measuring
While it's fairly straightforward to read a tape measure, some tips and tricks can make your measuring quicker and more accurate. These little things can make a big difference in your projects, helping you avoid mistakes, too.
Keeping the Tape Straight
Always try to keep the tape straight and flat against the surface you're measuring. If the tape sags or twists, your measurement will be off. For longer measurements, it can be helpful to have someone hold the other end, or use a clamp if you're working alone. This simple step, you know, prevents a lot of headaches later on.
Understanding the Hook's Movement
Remember how the sliding hook on the end of the tape works. For outside measurements, the hook pulls in. For inside measurements, it pushes out. Always make sure the hook is properly engaged for the type of measurement you're taking. This small detail is actually very important for precision, you see.
Reading at Eye Level
When you read the measurement, try to look at the tape straight on, at eye level. If you look at it from an angle, the line might appear to be in a slightly different spot, leading to an inaccurate reading. This is called parallax error, and it's a common mistake, too.
Marking Your Spot
Once you have your measurement, use a pencil or a marker to mark the exact spot. A small, clear mark is best. This ensures you transfer your measurement accurately to your material. It's a quick step that saves a lot of trouble, you know.
Getting Help
For very long items, it's often easier and more accurate to have a second person help you. One person can hold the zero end, and the other can pull the tape to the measurement point. This keeps the tape straight and steady, which is really helpful, honestly.
Common Tape Measure Features
Beyond just the markings, many tape measures have other features that make them easier to use. Knowing these can help you choose the right tape and use it more effectively. We’ll help you unlock tape measure features, you know, to make your work smoother.
The Lock Button
Most tape measures have a lock button or lever. This button lets you hold the tape blade in place once you've extended it to your desired length. This is super handy when you need to transfer a measurement or just want to keep the tape from retracting while you work. It's a simple feature, but it's very useful, you know.
The Case
The outer casing of a tape measure protects the blade and houses the retraction mechanism. Cases come in various materials, like plastic or metal, and some have rubber grips for better handling. A good case makes the tape measure comfortable to hold and more durable, which is important for tools you use often.
Blade Width
Tape measure blades come in different widths, typically from 1/2 inch to 1 inch or more. Wider blades tend to be stiffer and can extend further without bending, which is known as "stand-out." A wider blade is often preferred for longer measurements because it stays straight better, you know.
Stand-Out
Stand-out refers to how far the tape blade can extend horizontally before it buckles or bends. A tape measure with good stand-out is easier to use for one-person measurements, especially when you need to measure across a wide space without support. It's a sign of a quality blade, you see.
Stud Marks
On many imperial tape measures, you'll notice red marks or black diamonds at specific intervals, usually every 16 inches and sometimes every 24 inches. These marks indicate standard spacing for wall studs in construction. They are a quick visual reference for framing, which is very helpful for builders, you know.
Frequently Asked Questions (FAQs)
People often have similar questions about reading tape measures. Here are some common ones:
Learn more about using tools on our site.
How do you read a tape measure for beginners?
For beginners, the easiest way is by understanding what the 16 markings of an inch stand for. Start by identifying the full inch marks, then learn to count the smaller lines for fractions like 1/2, 1/4, 1/8, and 1/16. Practice finding these lines on different parts of the tape. This simple approach helps build your confidence, you know.
What is the quickest and easiest way to read a tape measure?
The quickest way is to first find the number next to the large tick mark that your measurement passes. Then, find how many small ticks past it the measurement is. Add the number next to the large tick with the fraction you count. With practice, you’ll be able to read measurements almost instantly, which is really helpful.
What are the main methods to using a tape measure?
There are two main methods for using a tape measure: measuring from an outside edge and measuring from an inside edge. For outside measurements, you hook the end of the tape onto the item. For inside measurements, you push the tape against the inside surface, using the case for the full length. Understanding how the sliding hook works is important for both methods, you know.
Ready to Measure with Confidence?
You now have a good grasp of how to read a tape measure, whether it's in inches or metric units. You've learned about the hook, the various markings, and practical steps for accurate measuring. We’ve also shown you how to read measurements on a tape and covered some common features. This knowledge will help you complete your projects with confidence, you know.
Remember, practice makes perfect. The more you use your tape measure, the more natural it will feel. So, go ahead, grab your tape measure, and start putting these tips into action. You'll be measuring like a pro in no time, which is really something.
For more detailed information on various measurement tools, you might find this resource helpful: National Physical Laboratory.
How to Read a Tape Measure - Tips, Tricks & Mistakes to Avoid - The

Reading a Tape Measure and Ruler PDF DIGITAL DOWNLOAD | Etsy
How to Read a Tape Measure - Tips, Tricks & Mistakes to Avoid - The
