Easy Eye Drawing: Your Simple Guide To Realistic Eyes
Have you ever looked at a beautiful portrait and wished you could draw eyes that truly pop, you know? It's almost a very common desire for anyone picking up a pencil, and it can seem like a bit of a mystery at first. But what if I told you that drawing realistic eyes, even for beginners, is much simpler than you might think? It's actually quite achievable, and you're about to find out how.
This guide is here to walk you through an easy way to draw a realistic-looking eye, broken down into simple steps. We'll cover everything from the basic shapes to adding those detailed touches that bring an eye to life. You'll get clear explanations and practical advice, making the whole process feel much less daunting, basically.
Our approach comes from a popular tutorial that has helped many aspiring artists, gathering over 9 million views. It's designed to be super simple and broken down into steps you'll love, showing you how to shade eyes for a truly realistic drawing. So, get ready to discover how easy eye drawing can really be!
- Stellan Skarsgård Children
- Rudy Pankow Girlfriend
- Caleb Williams Girlfriend
- Zion David Marley
- Katherine Kady Allen
Table of Contents
- How to Begin Your Easy Eye Drawing Journey
- Essential Tools for Your Eye Sketch
- Understanding Eye Anatomy for Better Drawings
- Step-by-Step Guide to Easy Eye Drawing
- Mastering Shading for Lifelike Eyes
- Common Eye Shapes and What to Look For
- Using References and Grids: It's Not Cheating!
- Frequently Asked Questions About Easy Eye Drawing
How to Begin Your Easy Eye Drawing Journey
Many people want to draw eyes, and it's almost a very popular starting point for aspiring artists, you know. It can seem a bit complex at first, but with the right approach, it's actually quite simple. This guide will show you how to begin drawing eyes the easy way, focusing on clear steps and building confidence as you go.
We'll break down the process into manageable parts, so you can build your skills naturally. It's about taking it one step at a time, rather than trying to get everything perfect at once. You'll find that practice makes a real difference, too, and each attempt brings you closer to your goal of a realistic eye.
This easy eye drawing tutorial for beginners is super simple and broken down into steps you'll love. It's designed to help you get comfortable with the shapes and shading needed to make eyes look alive. So, don't worry if you're just starting; this guide is here to help you succeed, basically.
- Kaylor Love Island
- Dakota Johnson And Chris Martin
- Erin Siena Jobs
- Sydney Sweeney Ass
- Were The Millers 2
Essential Tools for Your Eye Sketch
To get started with your easy eye drawing, you really don't need a lot of fancy equipment. Basically, a few pencils will do the trick. For drawing basic shapes and light outlines, an HB pencil is very useful, as a matter of fact. It's light and easy to erase, which is great for initial marks that you might want to adjust later.
For darker shades and adding more depth to your drawing, a 4B pencil works wonderfully. This pencil provides a richer, deeper tone that helps create shadows and strong contrasts. Then, for those tiny details that bring an eye to life, a 2B pencil is just right. It offers a good balance for both medium tones and fine lines, allowing for precise work.
Interestingly, you can even create a realistic eye using only one pencil, if that's what you have available. This shows that the technique and understanding of light and shadow are more important than having a full set of tools. The key is knowing how to use what you have to achieve different shades and textures, you know.
Understanding Eye Anatomy for Better Drawings
Knowing a little about how an eye is put together helps a lot with drawing, you know. It's not about memorizing medical terms, but understanding the basic parts and how they relate to each other. This includes the eyeball itself, the iris (the colored part), the pupil (the dark center), and the eyelids that protect and shape the eye. We'll also consider the tear duct in the inner corner and the surrounding skin that contributes to the overall look.
When you understand these components, it becomes easier to place them correctly and give your drawing a lifelike feel. It's like building something; knowing the parts helps you put them together properly, basically. For example, understanding that the eyeball is a sphere helps you shade it to appear rounded, rather than flat. This knowledge is quite important for getting those realistic touches.
Learning eye anatomy, shading techniques, and common eye shapes are all important for lifelike portraits. It's about seeing the eye not just as a flat shape, but as a three-dimensional object with curves and folds. This way of looking at it will really improve your easy eye drawing efforts, as a matter of fact.
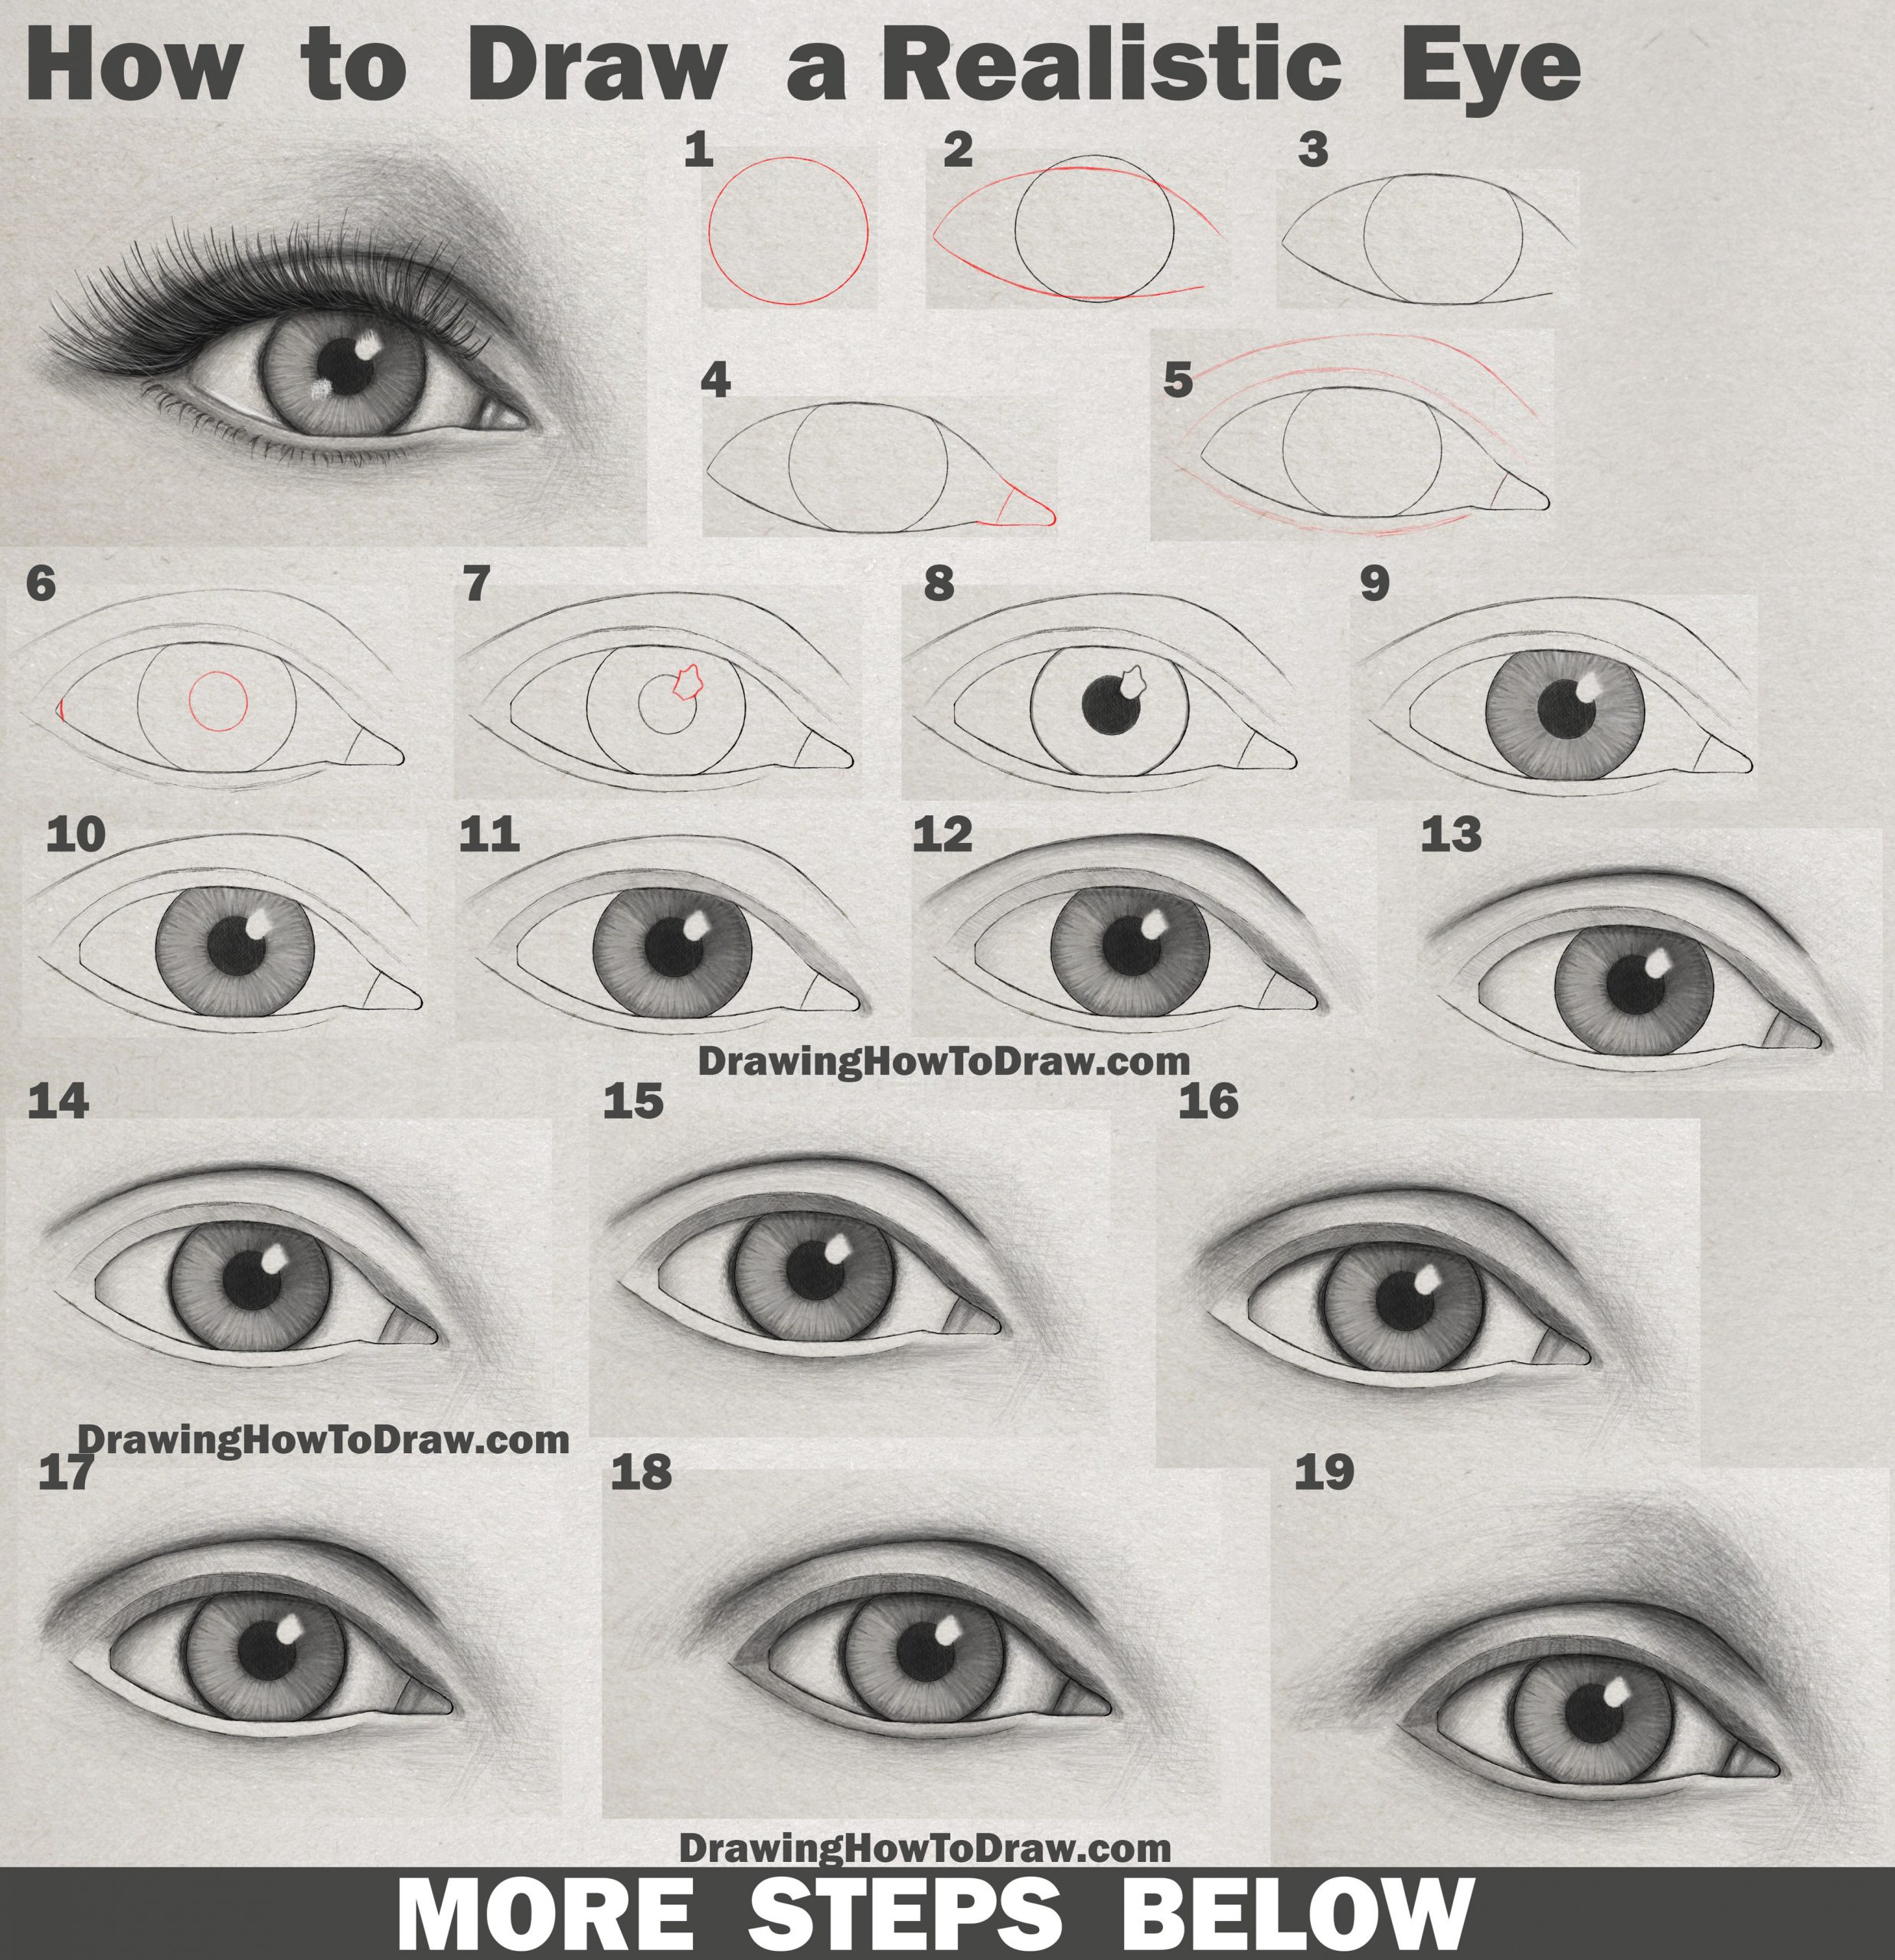
Step-by-Step Guide to Easy Eye Drawing
This tutorial, which has helped many people, shows an easy way to draw a realistic-looking eye in nine steps. It includes detailed illustrated examples and provides simple explanations to go along with them. You'll learn how to draw a realistic eye using these easy step-by-step instructions, making the process straightforward and enjoyable. Find out how to give your eyes depth and life with this detailed tutorial, you know.
Step 1: Basic Shapes
Begin by sketching the overall shape of the eye. Think of it more or less as an almond shape, or perhaps a bit like a lemon, lying on its side. Use your HB pencil for this, keeping your lines light and loose. This is just your foundation, so don't press too hard; these initial lines are just guides that you can adjust later, basically.
You're essentially mapping out where the eye will sit on your paper. This first step is very important for getting the proportions right before you add any specific details. It's about capturing the general outline of the eye opening, which will guide all your subsequent work, you know.
Step 2: Defining the Iris and Pupil
Next, draw the iris, which is the colored part of the eye. Remember, it's a circle, but usually, the upper and lower eyelids cover a bit of it, so you'll see more of an arc at the top and bottom. Inside the iris, draw the pupil, a smaller, darker circle right in the center. This is pretty important for giving the eye focus and making it look like it's actually looking at something.
Make sure the pupil is truly in the middle of the visible iris, unless you're drawing an eye looking sharply to one side. The size of the pupil can also change based on light, but for a standard drawing, a moderate size is usually fine. This step really starts to make your easy eye drawing recognizable, you know.
Step 3: Adding Eyelids and Tear Duct
Now, refine the eyelids. The upper lid tends to be thicker and casts a slight shadow over the top part of the eyeball, giving it dimension. Add the tear duct in the inner corner of the eye. It's a small, fleshy part that adds a lot to the eye's natural look and helps ground it in the face, actually.
Pay attention to the curve of both the upper and lower eyelids. They aren't just straight lines; they have a gentle curve that follows the shape of the eyeball underneath. The lower lid is often less prominent than the upper one, so keep your lines lighter there, basically.
Step 4: Starting Your Shading
This is where your drawing starts to gain depth and become more realistic. Begin with very light shading around the eye, especially under the upper eyelid and in the corners near the tear duct. Use your HB or 2B pencil for these initial soft tones. It's about building up layers gradually, rather than applying heavy pressure right away.
Think about where light would naturally fall and where shadows would appear. The area directly under the upper eyelid, for instance, will almost always have a shadow because the lid itself blocks some light. This initial shading sets the stage for more detailed work, you know.
Step 5: Creating Depth with Darker Tones
Switch to your 4B pencil for darker shades. Add more pronounced shadows in the crease of the eyelid, around the tear duct, and under the lower lash line. These darker areas make the eye appear more rounded and real, giving it a sense of three dimensions. It's quite effective for realism, as a matter of fact.
You can also add some shading to the whites of the eye, as they are rarely pure white. They will have subtle shadows from the eyelids and the general curve of the eyeball. This step is crucial for making the eye recede into the face and not look flat on the paper, basically.
Step 6: Detailing the Iris
The iris has many lines and patterns that make each eye unique. Use your 2B pencil to draw subtle lines radiating from the pupil outwards. These lines should not be perfectly straight; they should follow the slight curve of the iris. Leave a small, unshaded spot for the highlight, which gives the eye that shiny, wet look. This step really brings the eye to life, in a way.
You can also add some darker rings or spots within the iris to mimic the natural variations in eye color. Remember, the pupil itself should be the darkest part of the eye, a very deep black. This contrast helps the iris stand out and look more vibrant, you know.
Step 7: Drawing Eyelashes
Eyelashes are very important for realism and for framing the eye. They curve outwards and upwards from the upper lid, and outwards and downwards from the lower lid. They are not all uniform; some are longer, some shorter, and they often overlap in a natural way. Use short, flicking strokes with your 2B pencil, applying more pressure at the base of the lash and lightening up as you pull away.
Remember that eyelashes tend to be thicker at the base and taper to a fine point. Don't draw them as perfectly straight lines; give them a natural curve and slight variation in direction. This attention to detail will make your easy eye drawing look much more convincing, basically.
Step 8: Refining Highlights
The highlight is the brightest spot on the eye, reflecting light. Make sure it's clean and bright. You can use an eraser to lift some pigment if needed, or simply leave that area untouched from the beginning. This little detail makes the eye look wet and alive, which is actually quite stunning and adds a spark of life to your drawing.
The placement and shape of the highlight can vary depending on the light source. It might be a small dot, a streak, or even multiple small reflections. Experiment with different highlight shapes to see how they change the expression of the eye, you know.
Step 9: Final Touches for Realism
Go back over your drawing, adding any last details that will enhance its realism. This might mean darkening some shadows further, softening edges with a blending tool or a clean finger, or adding tiny wrinkles around the eye to show expression. Creating realistic eye drawing details on your final eye sketch makes a huge difference, really.
Look at your drawing from a distance to spot any areas that need adjustment. You might want to add subtle veins in the whites of the eye, or refine the texture of the skin around the eye. Find out how to give your eyes depth and life with this detailed tutorial by paying attention to these small but impactful elements, you know. It's about bringing everything together for a polished look.
Mastering Shading for Lifelike Eyes
Shading is absolutely key to making your eye drawing look realistic. It's not just about making things dark; it's about creating form and dimension, making the eye appear rounded and part of a face. Learn how to shade eyes for a realistic drawing by understanding how light falls on the eye and the surrounding areas. You'll want to think about the curves of the eyeball and the eyelids, and how they catch or block light.
Remember those different pencils? HB for light tones, 4B for the darkest parts, and 2B for detailing. Building up layers gradually is a good approach. Don't press too hard at first; you can always add more darkness. This process really helps to give the eye depth and make it pop, basically, making it seem to emerge from the paper.
Varying your pressure
- Kylie Jenner Timothee Chalamet
- Deion Sanders Kids
- Katherine Kady Allen
- Winona Ryder Young
- Lost Ending Explained

Easy Way to Draw Realistic Eyes: Step by Step https://youtu.be
Eye Drawing Very Easy at Sabrina Evans blog
20+ Easy Eye Drawing Tutorials for Beginners - Step by Step - HARUNMUDAK
