Learn How To Draw A Bee: A Simple Guide For Everyone
Do you ever look at a busy bee buzzing around and wish you could capture that charm on paper? It's a wonderful thought, and you know, drawing a bee can be a really fun and rewarding experience. Many people feel a little unsure where to start when it comes to art, but a bee is actually a perfect subject for beginners. It's got simple shapes, and you can make it as detailed or as cartoon-like as you wish, so it's almost always a good starting point for new artists.
There's something quite special about creating something with your own hands, isn't there? Drawing helps you see the world a bit differently, noticing shapes and colors you might otherwise miss. A bee, with its distinct stripes and delicate wings, offers a chance to play with basic forms and bring a tiny, important creature to life on your page. It's a very satisfying feeling, really, to see your drawing come together.
This guide will walk you through each step, making the process easy and enjoyable. We will go over everything you need to know to make your own adorable bee drawing, from the very first lines to adding those final touches. You will see just how simple it can be, and perhaps even discover a new favorite thing to draw. So, are you ready to pick up your pencil or open your drawing app? We are going to make some art!
- Satine Anais Geraldine Macht
- Jeff Bezos Yacht
- Prince Charles And Prince
- Brock Purdy Wife
- Gijs Van Der Most
Table of Contents
- Getting Ready: Your Drawing Tools
- Step-by-Step: How to Draw a Bee
- Drawing Digitally: Your Creative Friend
- Making Your Bee Unique
- Frequently Asked Questions About Drawing Bees
- Your Next Drawing Adventure
Getting Ready: Your Drawing Tools
Before we start drawing, it's good to have your materials ready. You don't need anything fancy, just some basic things you might already have around. For traditional drawing, you'll want a pencil, an eraser, and some paper. Any kind of paper will do, really, whether it's plain printer paper or a sketch pad. A regular pencil, like a HB or a 2B, works just fine for sketching, you know.
If you prefer drawing on a screen, that's perfectly okay too! Digital tools offer some really neat advantages. You can use a free online drawing application, for instance. Some of these apps let you create digital artwork and share it online. You can even export your work to popular image formats like JPEG, PNG, SVG, and PDF. It's quite convenient, actually, for sharing your creations with friends or family.
With a digital tool, you can easily draw, or even edit photos, which is pretty cool. You could design a business card, perhaps, or craft images for social media posts, digital ads, paper, or even apparel. Some apps let you make a quick photo edit with a drag and drop feature, or even offer shortcuts like drawing the letter “s” to get to a style chooser. You might also find that holding a button and tapping with different finger combinations can access tool presets, which is a neat trick. So, whether you like paper or pixels, you're ready to go.
- Xavier James Trudeau
- Movies To Stream This Weekend
- Ellen Degeneres Moving
- Pope Francis Young
- Dick Van Dyke Wife
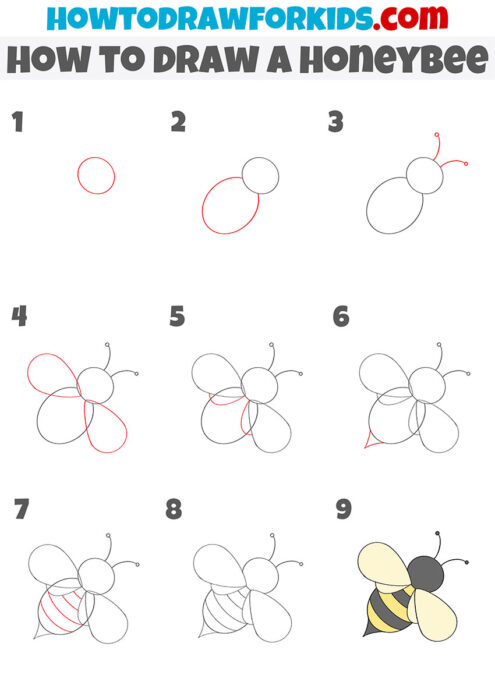
Step-by-Step: How to Draw a Bee
Now for the fun part: drawing your bee! We will take this one small step at a time. Try to keep your lines light at first, as these are just guides. You can always make them darker later, or erase them if you need to adjust something. It's like building something, you know, you start with the basic frame.
Starting with the Body Shape
Let's begin with the main part of the bee, its body. For this, we are going to draw a shape that looks a bit like an oval, or maybe a slightly squashed egg. It should be wider at one end and a little narrower at the other. This will be the bee's abdomen, which is its back section, and it's where the stripes will go. Make it a good size, not too small, but not so big it takes up the whole page, you know.
Think of it as the foundation for your bee. This first oval doesn't have to be perfect; no one's expecting a flawless circle. Just aim for a smooth, curved shape. This is just a guide, after all. It's kind of like sketching out where a house will go before you build the walls, so it's a very important first step.
Adding the Head and Thorax
Next, we will add the bee's head and the middle part of its body, which is called the thorax. For the head, draw a smaller circle, or a slightly rounded shape, at the narrower end of your first oval. This circle should touch the oval a little bit, like they are connected. It's going to be the front of your bee, where its face will be, so try to make it feel right in proportion to the body, you know.
Then, for the thorax, draw another oval, or a rounded rectangle, between the head and the main body oval. This middle section should be a bit smaller than the main body but larger than the head. It links the head to the abdomen, and it's where the wings and legs will attach. This part gives your bee its distinct segmented look, so it's a very key part of the shape.
Creating the Wings
Now, let's give our bee some wings so it can fly! Bees usually have two sets of wings on each side, but for a simple drawing, we can make it a bit easier. Draw two oval shapes coming out from the top of the thorax, the middle section you just drew. One oval should be a bit larger than the other, placed slightly behind it. These should look light and almost see-through. It's like drawing two little leaves, kind of, on each side.
Make sure these wing shapes are somewhat transparent-looking, even if you are just using a pencil. You can draw light lines inside them to suggest veins, but that's optional. These wings should appear delicate, almost like thin membranes. They are a really defining feature of a bee, you know, so take a moment to make them feel airy.
Drawing the Stripes
This is where your bee starts to look like, well, a bee! On the large abdomen section, draw a few curved lines going across the body. These will be your bee's stripes. Bees typically have yellow and black stripes, so think about where those colors will go. You can draw three or four stripes, depending on how big your bee is and how detailed you want it to be. Just make sure they follow the curve of the body, you know.
These stripes give your bee its characteristic look. You can make them thick or thin, whatever you prefer. They really help define the shape of the body and add a lot of personality. It's a bit like putting a pattern on a piece of clothing, so it's a fun step.
Placing the Legs and Antennae
Bees have six legs, but for a simple drawing, you don't need to show all of them. Draw three small, jointed lines coming down from the thorax on each side. These can be simple, bent lines, almost like little sticks. Make sure they look like they could help the bee stand up or hold onto a flower. You don't need to add tiny feet, just simple lines will do, you know.
For the antennae, draw two thin, slightly curved lines coming out from the top of the head. These should be fairly short and point slightly forward. At the end of each antenna, you can draw a tiny circle or a small dot to show the tip. These add a lot of character to your bee's face, so they are pretty important details.
Giving Your Bee a Face
Now for the most expressive part: the face! On the head circle, draw two small circles for the eyes. You can place them on the sides of the head, or a bit more towards the front if you want a cuter, more cartoon-like look. Inside each eye, you can add a smaller circle and fill it in to make it look like a pupil, giving your bee a gaze. It's a very simple thing to do, but it makes a big difference, you know.
For the mouth, a simple curved line below the eyes works well. You can make it a happy smile, or just a straight line. Some people like to add a tiny, almost heart-shaped nose, but that's entirely up to you. These small facial details truly bring your bee to life and give it a personality, so take your time here.
Cleaning Up Your Sketch
Once you have all your main shapes and details in place, it's time to clean up your drawing. Take your eraser and gently remove any extra pencil lines or guide marks that you don't need anymore. You know, those light lines you drew at the beginning. This makes your drawing look much neater and more finished. Be careful not to erase the lines you want to keep.
After erasing, you can go over your main lines with a darker pencil, a pen, or a fine-tipped marker. This makes your bee stand out and gives it a clear outline. If you are drawing digitally, this step is often called "inking," and it involves creating clean, solid lines over your sketch layer. It's a bit like tracing your own work, so it's quite satisfying.
Bringing It to Life with Color
Color is where your bee truly pops! The classic bee colors are yellow and black. You can color the body with alternating yellow and black stripes. The head and thorax are usually black or a very dark brown, you know. For the wings, you can use a very light blue, a light gray, or even just leave them white to make them look transparent. A little shading can also add depth.
Don't be afraid to experiment with other colors too! Maybe your bee is a fantasy bee with purple stripes, or a friendly green bee. Art is all about expressing yourself, so use colors that make you happy. You could even add a little blush to its cheeks if you want a super cute look. Color really brings out the fun in your drawing, so play around with it.
Drawing Digitally: Your Creative Friend
If you are using a digital drawing application, you have some cool features at your fingertips. Many apps let you use layers, which means you can draw your sketch on one layer and then draw your clean lines and colors on separate layers above it. This makes it really easy to correct mistakes or change things without messing up your whole drawing. It's a very handy way to work, you know.
You can also easily change brush sizes, colors, and even textures with a click. Some apps let you create digital artwork to share online and export to popular image formats like JPEG, PNG, SVG, and PDF. This is great for sharing your bee with friends or even using it in other projects. You can easily draw, edit photos, or design your next business card, so it's a versatile tool. Craft images for social media posts, digital ads, paper, or even apparel. It's quite amazing what you can do.
Remember how "My text" mentioned making a quick photo edit with the drag and drop feature, or drawing the letter “s” to take a shortcut to the style chooser? These kinds of features can really speed up your creative process. Also, holding a button and tapping the screen with different finger combinations to access tool presets can save you time. Digital drawing offers a lot of flexibility, so try out different tools and see what you like best.
Making Your Bee Unique
Now that you know the basic steps, feel free to make your bee truly your own. You could give it a tiny flower to hold, or draw it buzzing around a honey pot. Maybe your bee wears a little hat, or has super long eyelashes. There are so many ways to add your personal touch. It's all about having fun and letting your imagination lead the way, you know.
You could also try different styles. A very simple, cartoon bee is great for beginners. If you feel more adventurous, try adding more realistic details, like fuzzy texture on its body or more intricate wing patterns. Practice is the key to getting better, so don't worry if your first bee isn't perfect. Every drawing is a step forward, so just keep going.
Frequently Asked Questions About Drawing Bees
What is the easiest way to draw a bee?
The easiest way to draw a bee involves using simple shapes like ovals and circles. You start with a large oval for the body, then add a smaller oval for the thorax and a small circle for the head. Wings can be simple leaf-like ovals, and legs and antennae are just thin lines. This method breaks the bee down into very manageable parts, making it accessible for anyone. It really takes away any feeling of it being too hard, you know.
How do you draw a cute cartoon bee?
To draw a cute cartoon bee, focus on exaggerating certain features. Make the eyes larger and more expressive, perhaps placing them closer together or adding little sparkle dots. Give it a big, friendly smile. You can also make the body a bit rounder and chubbier, and the wings a little more whimsical. Using bright, cheerful colors also helps make it look adorable. It's about giving it a friendly personality, you know.
What colors do you use to draw a bee?
Traditionally, bees are drawn with yellow and black for their striped bodies. The head and thorax are usually black or a very dark brown. For the wings, light blues, grays, or even just white can give them a transparent look. You can also add a touch of pink or red for rosy cheeks on a cute cartoon bee. Of course, you are free to use any colors you like for a creative twist, so don't feel limited.
Your Next Drawing Adventure
You did it! You have drawn a bee, and that's a wonderful accomplishment. Learning to draw is a journey, and every little step, like drawing this charming bee, helps you grow as an artist. Don't stop here, though! Keep practicing, try drawing different animals, or even just objects around your home. The more you draw, the more comfortable and confident you will become with your skills. It's a really rewarding hobby, you know.
Remember, there are so many free online drawing applications out there that can help you keep practicing. Many let you create digital artwork to share online and export to popular image formats. You can learn more about digital drawing tools on other sites, and discover more about basic drawing techniques on our site. Keep creating, keep exploring, and most importantly, keep having fun with your art!

How to Draw a Bee - HelloArtsy
How to Draw a Bee - Easy Tutorial For Kids
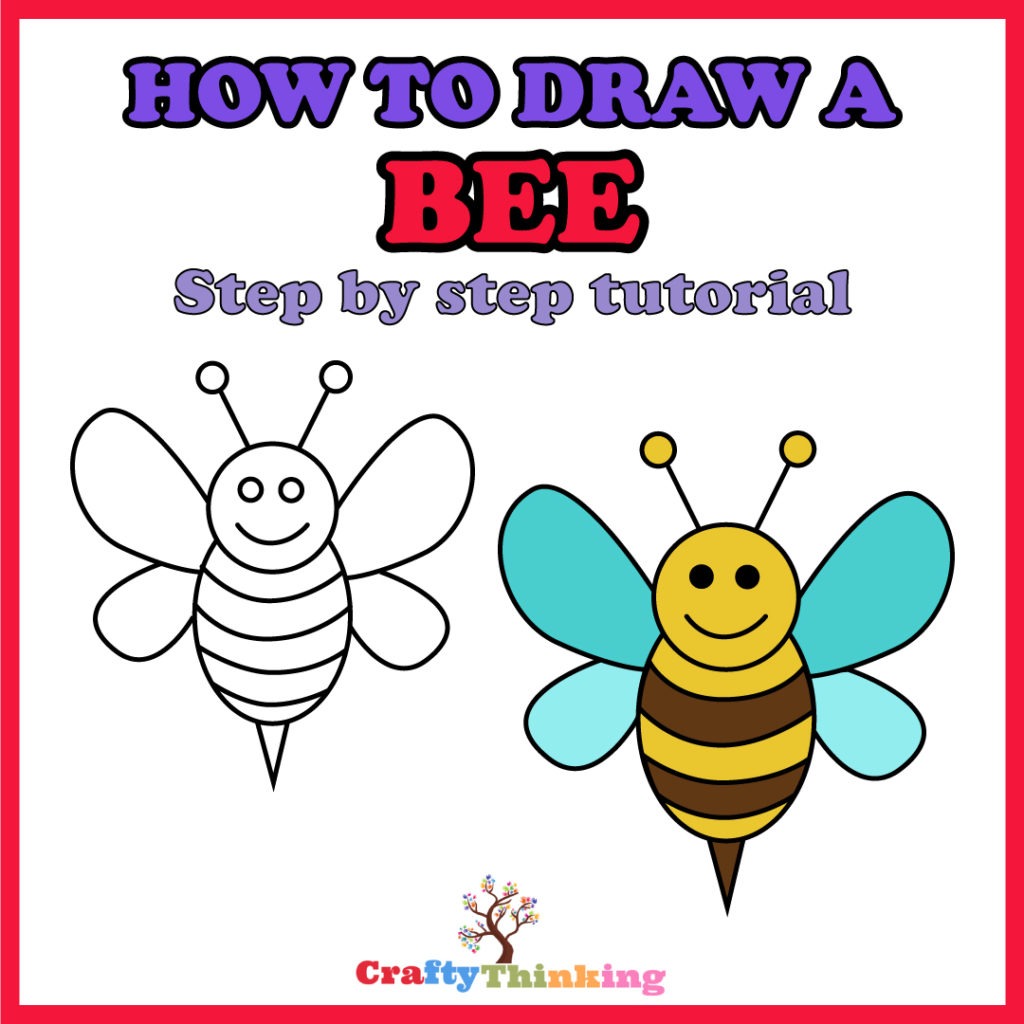
How To Draw A Bee (Step By Step) - CraftyThinking
