Easy Steps To Draw A Book: Your Guide To Sketching Stories
Have you ever wanted to bring a story to life, even before you write a single word? Perhaps you simply enjoy the idea of sketching everyday items. Learning how to draw a book can be a surprisingly rewarding creative activity. It's almost a simple way to start your drawing journey, whether you are picking up a pencil for the first time or looking to sharpen your existing skills. This guide will show you how to make a book appear on your page, one simple line at a time.
You might think drawing a book is a rather difficult or complex thing to do, but that is not the case at all. With the right guidance and a little practice, anyone can sketch a believable book. We will walk you through the process, from creating the basic shape to adding those little details that make your drawing truly pop. It's really about breaking it down into smaller, manageable parts, you know?
So, if you are ready to create some lovely book drawings, whether for fun, a school project, or just to try something new, you've come to the right place. We will explore different ways to represent books, like a book standing up, a book cover, or even an open book, giving you plenty of options for your artwork.
Table of Contents
- Getting Ready: Your Drawing Tools
- The Basic Shape: A Closed Book
- Making It Real: Shading and Texture
- Drawing a Book Standing Up
- Drawing an Open Book
- Designing a Book Cover
- Using Digital Tools for Your Book Drawings
- Common Questions About Drawing Books
- Your Next Drawing Adventure
Getting Ready: Your Drawing Tools
Before you begin to draw, it's a good idea to gather your materials. You don't need anything too fancy, you know? A simple pencil, an eraser, and some paper will do the trick for traditional drawing. If you are leaning towards digital art, a tablet and a stylus are helpful, or perhaps just your computer and mouse with an online drawing application.
For those who prefer drawing on a screen, remember "My text" is a free online drawing application for all ages. It lets you create digital artwork that you can share online and export to popular image formats like JPEG, PNG, SVG, and PDF. This means you can easily draw, edit photos, or even design your next business card, so it's quite versatile.
It's really about choosing what feels right for you. Some people like the feel of paper, while others enjoy the freedom and undo options of digital drawing. Either way, the steps for how to draw a book will stay mostly the same.
- Kenny Chesney Donation
- Seven Sirius Benjamin
- Vanessa Hudgens Baby
- Greatest Showman Broadway
- Megyn Kelly Husband
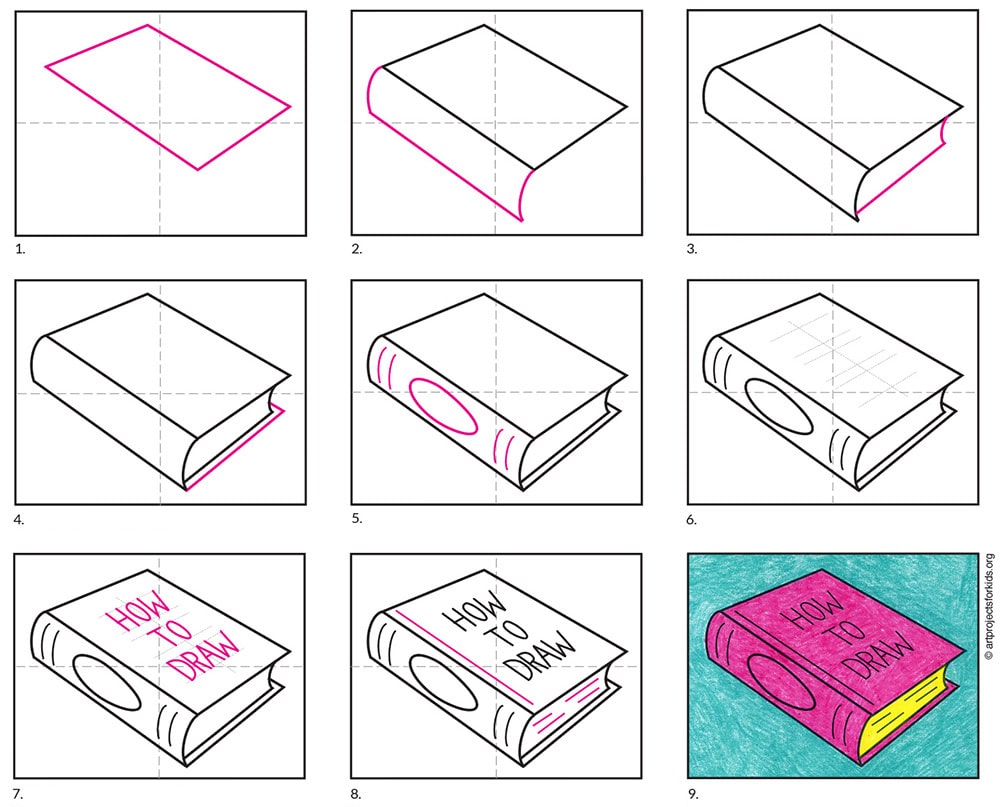
The Basic Shape: A Closed Book
Let's start with the most straightforward representation: a closed book lying flat. This is the foundation for almost any book drawing you might want to create. It's a bit like learning your letters before you write a story, you know?
Step 1: Start with a Rectangle
The very first thing you will do is draw a simple rectangle. This shape will represent the front cover of your book. Think about the size and proportion you want your book to have. A longer, thinner rectangle will give you a taller book, while a wider, shorter one will make a broader book. Don't press too hard with your pencil here, as these lines are just guides, you know?
If you are using a digital tool like "My text", you can often use a shape tool to create a perfect rectangle, which is pretty handy. This can save you some time and make sure your initial shape is very neat.
Step 2: Add Depth and Thickness
Now, to give your book a three-dimensional look, you will add lines to show its depth. From each corner of your first rectangle, draw a short line going slightly upwards and to the right, or to the left, depending on your preferred perspective. These lines should all be parallel to each other. This is a bit like drawing a box, really.
After drawing these short lines, connect their ends with two more lines. One will form the side of the book, and the other will form the bottom edge. This creates a second rectangle, offset from the first, which gives the illusion of thickness. It's important that these connecting lines are also parallel to the sides and bottom of your first rectangle, that is.
Step 3: Defining the Spine
The spine is the part of the book where the pages are bound together. To draw this, you will add a slightly curved line along the top edge of the book's thickness. This curve makes it appear as if the book has pages inside, and it gives it a softer, more realistic look than just a sharp corner. You know, books aren't usually perfectly rigid.
Then, draw another curved line directly below the first, following the same arc. This will create the full shape of the spine. Think about how a real book looks when it's closed; the spine usually has a gentle curve to it.
Step 4: Page Details and Edges
To show the pages, draw several very thin, short lines along the open edge of the book. These lines should follow the curve of the spine slightly, creating the appearance of many individual pages. Don't draw too many lines, just enough to suggest the texture of the page block. It's more about implying than drawing every single page, so.
You can also add a faint line along the top and bottom edges of the book to separate the cover from the pages. This helps to define the different parts of the book and makes it look more believable. It's a subtle detail, but it really makes a difference, you know?
Step 5: Clean Up and Refine
Now is the time to erase any extra guide lines you drew in the beginning. Make your main lines a bit darker and more definite. Look at your drawing and see if any lines need to be straightened or adjusted. This step is about making your book look neat and finished.
This is where "My text" can be very helpful, as you can easily undo mistakes or refine lines without leaving eraser marks. It's a quick photo edit with the drag and drop feature, or you can draw the letter “s” to take a shortcut to the style chooser, which is pretty cool. You can also hold the button and tap the screen with different finger combinations to access tool presets that have been setup in the tool, making refinement easier.
Making It Real: Shading and Texture
Adding shading and texture can really make your book drawing come alive. Think about where your light source is coming from. The parts of the book facing away from the light will be darker, and the parts facing the light will be brighter. This creates a sense of depth and form.
Use cross-hatching or blending techniques to add shadows to the sides and spine of the book. You can also add a subtle shadow underneath the book to make it look like it's resting on a surface. This helps ground your drawing and makes it seem more real. It's a very simple trick, but it works wonders, you know?
For texture, consider the material of the book cover. Is it a hardback, a paperback, or something else? You can add faint lines or dots to suggest fabric, leather, or paper. Even a slightly uneven line on the page edges can give the impression of many individual sheets.
Drawing a Book Standing Up
Drawing a book standing up is a bit different but still uses the same basic principles. Start with a tall, narrow rectangle for the spine. Then, from the top and bottom corners of this spine, draw lines extending outwards to create the front and back covers. These lines will angle slightly away from the spine, giving the impression of a book that's slightly open or just standing on its own.
Remember to add thickness to the covers, just like you did for the closed book. The pages will be visible along the front edge, so you'll add those thin lines there. You might also want to add a slight curve to the spine if it's a paperback or a well-read book. It's a different angle, but the shapes are still pretty familiar, you know?
You could also draw a small, flat rectangle at the bottom of the book to represent the surface it's resting on, which helps with perspective. Adding a cast shadow behind the book will also make it feel more stable and real on the page.
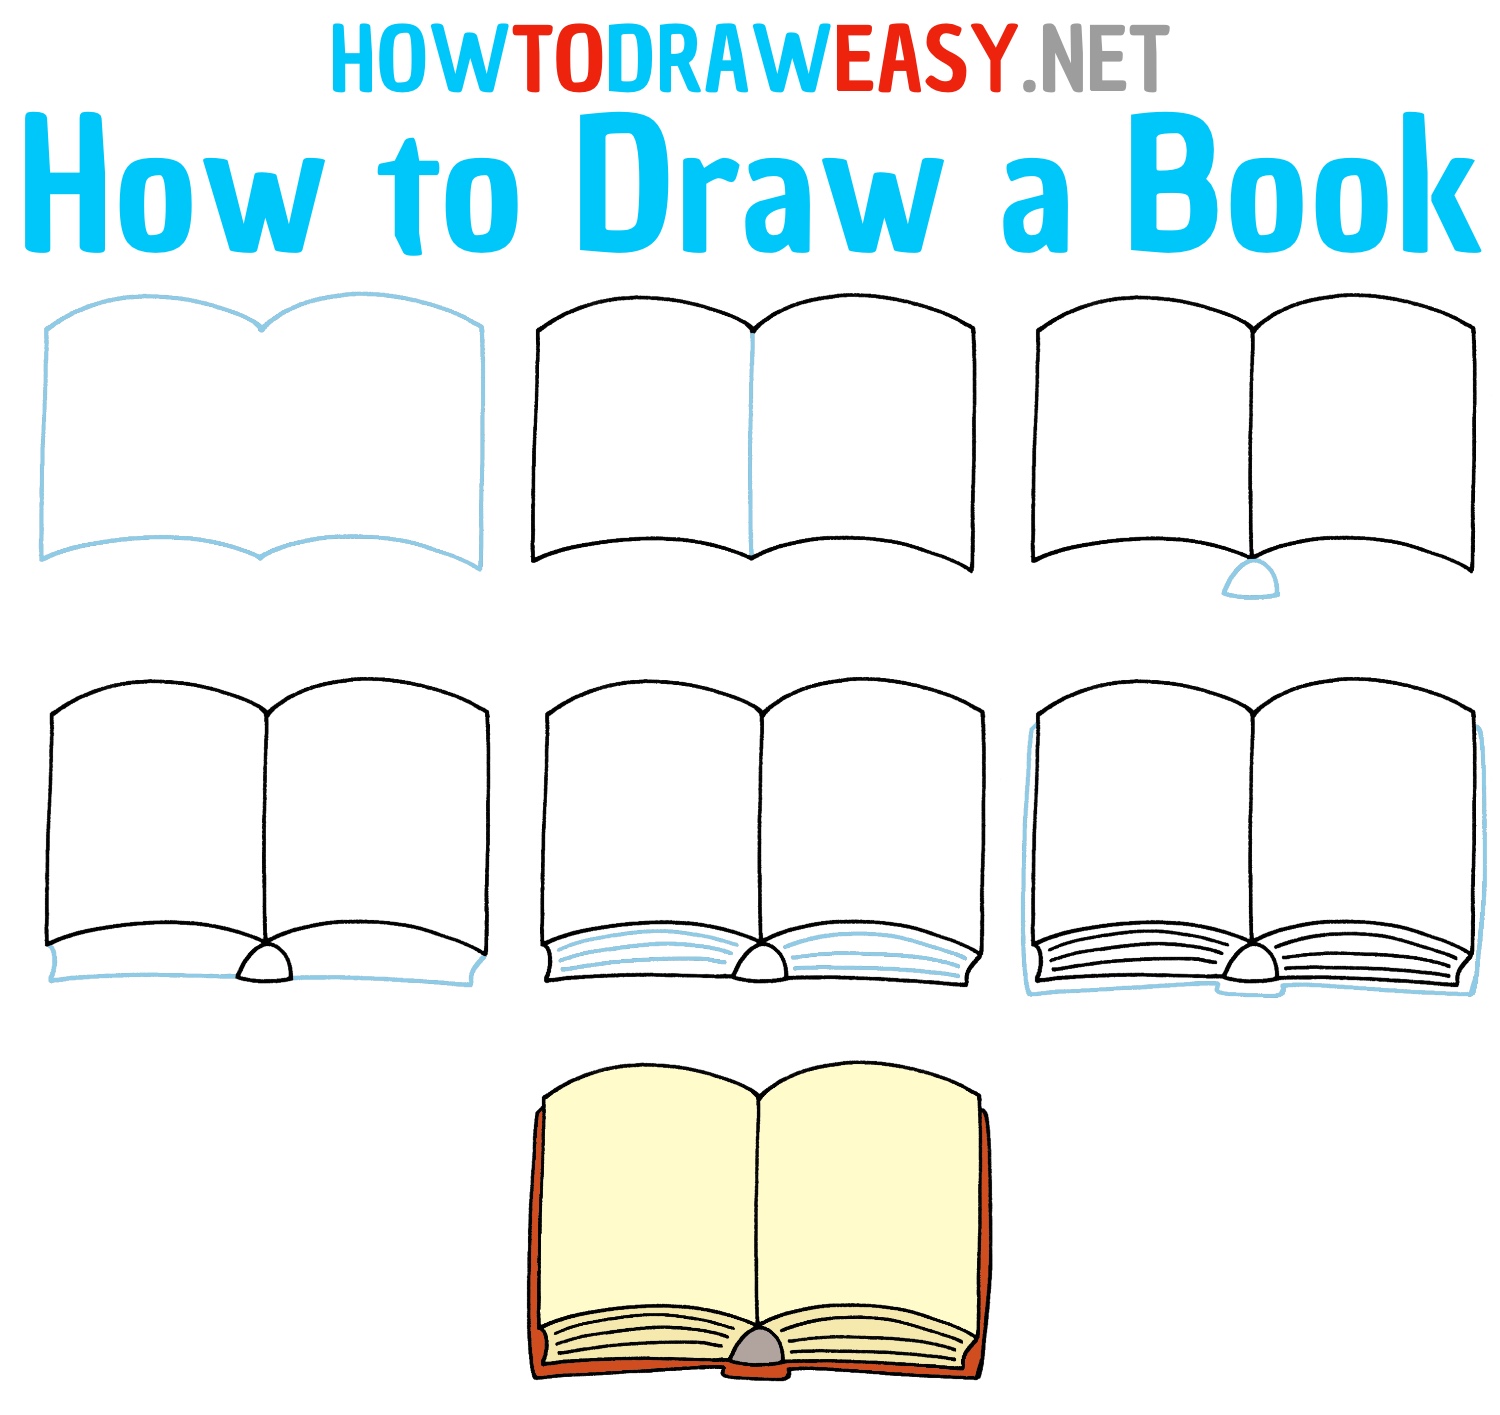
Drawing an Open Book
An open book is a bit more challenging, but it's very rewarding to draw. Start by sketching a "V" shape for the opening of the book. This will be the gutter where the pages meet. From the top points of the "V," draw curved lines outwards and downwards to form the top edges of the open pages.
Then, from the bottom points of the "V," draw curved lines outwards and upwards to create the bottom edges of the pages. The curves should reflect how pages naturally bend when a book is open. Add faint lines radiating from the "V" to represent the individual pages.
You will also need to draw the covers of the open book, which will lie flat on either side of the open pages. These will be somewhat rectangular shapes, but they will follow the perspective of the open book. Don't forget to add thickness to the covers and a slight curve to the spine area where the book is open. It's all about those curves and angles, you know?
Designing a Book Cover
Once you have the basic shape of your book, you can get creative with the cover. This is where you can truly make your drawing unique. Think about what kind of story your book would tell. Would it have a bold title, an interesting image, or a simple pattern?
You can add text, simple illustrations, or even abstract designs to your book cover. If you are drawing digitally with "My text", you have a huge advantage here. You can experiment with different colors, fonts, and even import images to place on your cover. It's a bit like being a graphic designer for a moment, you know?
Remember that the cover wraps around the book, so some of your design might be visible on the spine and the back cover, depending on your perspective. This adds another layer of realism to your drawing.
Using Digital Tools for Your Book Drawings
As mentioned, learning how to draw a book step by step has never been easier than with this book drawing tutorial, especially when you use digital tools. "My text" is a very good example of this. It's a free online drawing application that offers many benefits for artists of all levels.
With "My text," you can easily draw, edit photos, or design your next business card. You can craft images for social media posts, digital ads, paper, or even apparel. This means your book drawings aren't just stuck on your screen; you can export them to popular image formats like JPEG, PNG, SVG, and PDF, and share them with others.
The application makes it simple to create the base shape, add realistic page details, and color your drawings. You can make a quick photo edit with the drag and drop feature, or use shortcuts like drawing the letter “s” to take a shortcut to the style chooser. While holding a button, you can tap the screen with different finger combinations to access tool presets that have been setup in the tool, which is very efficient. In no time, you can have fun drawing a closed book, an open book, or a book standing up. It's a very accessible way to get creative, you know?
Using digital tools also allows for easy experimentation. You can try different colors, textures, and even perspectives without worrying about wasting paper. This freedom can really help you explore your creative ideas and improve your drawing skills faster.
You can learn more about digital art tools on our site.
Common Questions About Drawing Books
Is it hard to draw a book?
No, drawing a book may seem like a complex and difficult task, but it doesn’t have to be. It's a matter of breaking down the book into simple shapes like rectangles and then adding details. With a step-by-step approach, it becomes very manageable for anyone, even beginners.
What shapes do you use to draw a book?
You primarily use rectangles and slight curves to draw a book. Rectangles form the main body and covers, while gentle curves are used for the spine and the edges of the pages to give it a natural appearance. It's almost all based on basic geometry, you know?
How do you make a book drawing look real?
To make a book drawing look real, focus on adding depth through perspective, using shading to show light and shadow, and including subtle details like page lines and a slightly curved spine. These elements give the drawing a three-dimensional quality and make it appear more believable. You can find more tips on making your drawings look real by exploring perspective drawing techniques.
Your Next Drawing Adventure
Drawing a book is a fantastic way to practice basic shapes, perspective, and shading. Books come in many shapes and sizes, and this is only the most basic way to draw one. You can try altering some of the steps to come up with the image you have in your mind, and sketch. Remember, practice is key, and every drawing you make helps you improve.
So, grab your tools, whether they are traditional or digital, and start sketching. Don't be afraid to experiment with different styles, colors, and textures. The more you draw, the more comfortable you will become, and the more unique your artwork will be. For more drawing inspiration and guides, you might want to check out some general art resources, like this one on how to draw books.
Happy drawing!
- Ruby Sweetheart Maguire
- Caitlin Clark Partner
- Nakoa Wolf Manakauapo Namakaeha Momoa
- Kendall Jenner Naked
- Jordan Chiles Fashion Week Dress
Easy How to Draw a Book Tutorial and Book Coloring Page
How to Draw a Book - How to Draw Easy

How to draw a book easy step by step tutorial you ll love – Artofit
