How To Remove Security Tag From Clothes: Your Easy Home Guide
It's a moment many of us have experienced, that feeling when you get home, excited about your new purchase, only to discover a pesky security tag still attached. You might feel a wave of frustration, thinking about the trip back to the store, but honestly, you don't have to panic. Fortunately, you can get a security tag off at home without taking a trip all the way back to the store. We've put together an entire list of easy methods to safely and effectively deal with this little problem, so you can enjoy your new clothes right away.
You know, it's a pretty common occurrence, that, where a store might just forget to take off a security device. These little gadgets, you see, are small signal transmitters that firms attach to their products, particularly clothing. They're there to prevent someone from trying to take the item and pass through the exit without paying. But when they're left on by mistake, they can be a real bother, and honestly, returning to the store isn't your only option.
This guide, you might say, outlines how to remove security tags from clothes when the store has forgotten to remove them. We'll explore the different types of tags and, in a way, how to open each one. You'll learn different methods to safely remove a security tag from clothing at home without damaging the fabric or triggering ink stains, which is very important. So, let's get that tag off and get you wearing your new item.
- Kicked Off Flight Misgendering
- Skai Jackson Boyfriend
- Katherine Kady Allen
- Prince George And
- Rudy Pankow Girlfriend
Table of Contents
- Understanding Security Tags
- Why Remove a Security Tag at Home?
- Types of Security Tags You Might Encounter
- Essential Safety Precautions Before You Begin
- Method 1: The Rare Earth Magnet Approach
- Method 2: The Dremel or Cutting Tool Technique
- Method 3: The Rubber Band Strategy
- Method 4: The Freezing Trick for Ink Tags
- Method 5: The Fork or Screwdriver Lever Method
- Frequently Asked Questions
- Final Thoughts on Tag Removal
Understanding Security Tags
A security tag, you see, is more than just a piece of plastic. It's a small device designed to trigger an alarm if an item leaves a store without proper deactivation. These gadgets, which are pretty common, are a part of a store's way to keep things secure. They come in various shapes and sizes, and honestly, knowing a little about how they work can help you remove them more effectively. They often have a pin that goes through the fabric and locks into the main body of the tag, which is that, what holds it in place.
Why Remove a Security Tag at Home?
Well, sometimes, the store simply forgets to take the tag off. You get home, perhaps after a long day, and there it is, still clinging to your new shirt or pair of pants. The thought of going all the way back to the store, maybe even in heavy traffic, is just a little daunting, isn't it? That's why learning how to remove a security tag from clothes at home is a skill that can really save you time and hassle. It's about convenience and getting to enjoy your purchase right away.
Types of Security Tags You Might Encounter
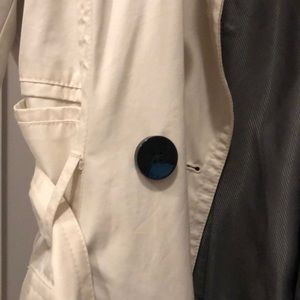
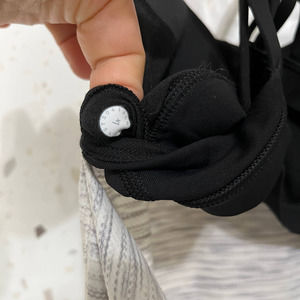
Not all security tags are the same, you know. There are a few main kinds you might run into, and understanding which one you have can really help you choose the best removal method. Basically, the two most common types are the solid pin tags and the ink tags. Solid pin tags are just that, a solid piece of plastic with a pin. Ink tags, however, contain small vials of ink that will burst if the tag is tampered with incorrectly, staining your clothes. This is why care is very important when you're working with them.
Hard Tags (Pin Tags): These are the most common kind, typically made of hard plastic. They have a pin that goes through the fabric and locks into a dome or box-shaped part. They're usually opened with a strong magnet at the store's checkout counter. They are, in a way, designed to be pretty tough.
Ink Tags: These are a bit trickier, as they contain small capsules of indelible ink. If you try to force them open incorrectly, the ink can spill onto your clothing, making a permanent mark. You really need to be careful with these, as a matter of fact.
Essential Safety Precautions Before You Begin
Before you try any method to remove a security tag from clothes, safety is paramount. Seriously, you don't want to damage your new item or, worse, get ink all over it. Here are some very important things to keep in mind:
Identify the Tag Type: Always check if your tag is an ink tag. If it has a flat, clear section where you can see little vials of liquid, it's an ink tag. Treat these with extra caution, as you might imagine.
Protect Your Clothing: If you're working with an ink tag, place a few layers of paper towels or an old rag directly under the tag on both sides of the fabric. This can absorb any accidental ink spills, which is pretty helpful.
Work on a Stable Surface: A flat, sturdy table or counter is ideal. This gives you a good, stable base to work from.
Use Proper Tools: Make sure any tools you use are in good condition and suitable for the task. Dull tools can slip and cause damage, you know.
Take Your Time: Rushing can lead to mistakes. Be patient and work slowly, especially if it's your first time doing this. There's no real hurry, anyway.
Method 1: The Rare Earth Magnet Approach
This is arguably the most common and often the safest method, especially for those standard hard tags. To remove a clothing security tag, you’ll need a rare earth magnet, similar to the magnets found in computer hard drives. These magnets are incredibly strong, and that's what makes them so effective for this particular job. You can usually find them online or in specialty shops, honestly.
What You Will Need
A strong rare earth magnet (e.g., Neodymium magnet). You can often find these by taking apart an old computer hard drive, or you can buy them online. Just search for "Neodymium magnet" and you'll find plenty, as a matter of fact.
Your item of clothing with the security tag.
Step-by-Step Instructions
Locate the Pin Mechanism: Most security tags have a small, spring-loaded clutch inside that holds the pin in place. This clutch is usually located in the wider, dome-shaped part of the tag. You'll want to find that spot, you know.
Position the Magnet: Place the strong rare earth magnet on a flat surface. Now, carefully position the wider part of the security tag directly over the magnet. You want the pin end of the tag facing up, away from the magnet. The magnet's strength will, basically, pull the metal ball bearings inside the tag's clutch mechanism away from the pin, releasing it.
Apply Gentle Pressure: While holding the tag over the magnet, gently pull the clothing away from the tag. You should feel a slight release or hear a small click. If it's a bit stubborn, try wiggling the tag slightly or adjusting its position on the magnet. Sometimes, it just needs to be in the right spot, you know.
Separate the Tag: Once the clutch releases, the pin should come free from the tag. You should be able to separate the two halves of the tag from your clothing without any trouble. This method is usually very clean and leaves no damage, which is really nice.
Method 2: The Dremel or Cutting Tool Technique
This method is a bit more involved and requires a power tool, so it's probably best for those who are comfortable using such equipment. It's particularly useful for tags that don't respond to the magnet method or have a different design. You'll be, in a way, cutting through the plastic to get to the pin. This is where precision really matters, as a matter of fact.
What You Will Need
A Dremel tool or a similar rotary tool with a cutting disc or grinding bit. You can usually find these at hardware stores.
Safety glasses. Seriously, eye protection is non-negotiable here.
Gloves (optional, but recommended for grip and protection).
An old towel or thick cloth to protect your work surface and the clothing from debris.
Step-by-Step Instructions
Prepare Your Work Area: Lay your clothing flat on a sturdy surface, placing an old towel underneath the security tag to catch any plastic bits. Make sure the clothing is pulled taut around the tag so it doesn't get caught in the tool. You want a very stable setup.
Identify the Target Area: Look at the security tag. You'll typically want to target the small pyramid, nipple, or raised part on the top of the tag, which is where the pin mechanism is often housed. This is where you'll make your cut, you know.
Put on Safety Gear: Don your safety glasses. This is very important, as small pieces of plastic can fly off.
Carefully Slice: Using the Dremel with a cutting disc, carefully slice off the pyramid or nipple. Go slowly and apply gentle, consistent pressure. You're not trying to cut through the entire tag at once, just the top layer. This should reveal metal pins attached through the clothing and the two halves of the tag.
Remove the Pin: Once you've exposed the metal pins, you should be able to bend or cut them with a pair of pliers or wire cutters. With the pins removed, the two halves of the tag will separate, and you can pull them off your clothing. Be careful not to damage the fabric underneath, obviously.
Method 3: The Rubber Band Strategy
This method is often suggested for the larger, rectangular security tags, especially those with a visible pin that goes into a flat base. It relies on brute force, in a way, but when done carefully, it can be quite effective. It's a bit of a classic, honestly, for getting these things off.
What You Will Need
One or two strong, thick rubber bands. The kind you might find holding together a bunch of broccoli, perhaps.
Your item of clothing with the security tag.
Step-by-Step Instructions
Position the Tag: Hold the clothing so the larger, main part of the security tag is on one side of the fabric and the smaller, pin side is on the other. You want to create some tension, you know.
Wrap the Rubber Band: Take a strong rubber band and loop it around the pin that protrudes from the smaller part of the tag. Then, stretch the rubber band over the larger, main body of the tag. You want to get it wrapped around the pin and then pulled tightly over the other side of the tag.
Apply Pressure and Pull: With the rubber band creating tension, pull the clothing away from the tag with one hand, while simultaneously wiggling the tag with the other. The goal is to create enough pressure and leverage with the rubber band to force the pin out of its locking mechanism. This might take a few tries, and you might need to adjust the rubber band's position. It's a bit of a trial and error process, actually.
Release the Tag: If successful, the pin will pop out, and the tag will come apart. This method can sometimes cause the tag to fly off, so be mindful of where it might go. It's pretty satisfying when it works, though.
Method 4: The Freezing Trick for Ink Tags
This method is specifically for ink tags, and it's a preventative measure more than a removal technique. The idea is to freeze the ink inside the tag, making it less likely to burst and stain your clothing if you accidentally apply too much pressure during removal. It's a smart little trick, honestly, for peace of mind.
What You Will Need
Your item of clothing with the ink security tag.
A freezer-safe bag or plastic wrap.
A freezer.
Step-by-Step Instructions
Wrap the Tag: Carefully wrap the security tag itself (and a small area of the surrounding fabric) in a freezer-safe bag or plastic wrap. You want to make sure no moisture gets directly on the tag or the fabric, which is pretty important.
Place in Freezer: Put the wrapped tag and the part of the clothing it's attached to into your freezer. Make sure the tag is positioned so it won't be accidentally crushed or bumped by other items. Leave it there for at least a few hours, or even overnight, to ensure the ink is thoroughly frozen. The colder, the better, honestly.
Attempt Removal (Carefully): Once the tag is frozen solid, you can then attempt one of the other removal methods, like the magnet method or the rubber band method, with a bit more confidence. The frozen ink is less likely to spill. However, still proceed with extreme caution, as there's no guarantee the ink won't still make a mess if you're not careful. It just reduces the risk, you know.
Method 5: The Fork or Screwdriver Lever Method
This method works by prying open the two halves of the security tag, often targeting the pin mechanism. It requires a bit of finesse and patience, and honestly, you need to be careful not to damage the fabric or slip with your tool. It's a common approach for some of those rounder tags, you know.
What You Will Need
A sturdy fork (one with strong tines) or two flat-head screwdrivers.
Your item of clothing with the security tag.
An old cloth or towel to protect your clothing and hands.
Step-by-Step Instructions
Identify the Seam/Gap: Look closely at the security tag. Many tags have a small seam or a tiny gap where the two halves of the tag meet. This is where you'll try to insert your tool. It's basically a weak point, you might say.
Insert the Tool: Carefully insert the tines of the fork or the flat head of a screwdriver into this seam or gap. If you're using two screwdrivers, you can insert one on each side of the pin, if that makes sense.
Apply Leverage: Gently twist or pry the tool to create a small opening. The goal is to pry apart the two halves of the tag just enough to release the pin. You might hear a small click as the locking mechanism disengages. This step requires a bit of gentle force, but not too much, as a matter of fact.
Separate the Tag: Once the pin is released, the two parts of the tag should come apart. Pull them away from your clothing. Be very careful not to poke holes in your fabric with the fork or screwdriver. It's a delicate operation, you know.
Frequently Asked Questions
People often have a few questions when they're trying to figure out how to remove a security tag from clothes. Here are some common ones:
Q1: What happens if I try to remove an ink tag incorrectly?
A1: If you try to force an ink tag open without care, the small vials of ink inside are very likely to burst. This will release indelible ink, which can permanently stain your clothing. It's a pretty big risk, so always proceed with extreme caution and consider freezing the tag first.
Q2: Is it illegal to remove a security tag at home?
A2: No, it's not illegal if you lawfully purchased the item. The problem arises when a store forgets to remove the tag. This guide is for situations where you legitimately own the item and simply need to remove a forgotten tag. It's not for, you know, stealing things.
Q3: Can I damage my clothing by trying to remove a security tag myself?
A3: Yes, there's always a possibility of damaging your clothing, especially if you're not careful or use the wrong tools. This is why it's so important to follow the instructions carefully, use the right safety precautions, and choose the method best suited for your specific tag type. Taking your time is very key to avoiding rips or tears.
Final Thoughts on Tag Removal
Dealing with a forgotten security tag can be a bit annoying, but as you can see, you have several options to safely remove it at home. Whether you use the clever magnet trick, a Dremel, a rubber band, or even a fork, the key is always to proceed with caution and patience. Remember to identify your tag type, especially if it's an ink tag, and always prioritize protecting your clothing from damage or stains. With these methods, you can, in a way, get your new clothes ready to wear without an extra trip back to the store. Learn more about clothing care on our site, and link to this page for more tips on fixing common clothing problems.
- Alexis Sofia Cuban
- Caitlin Clark Partner
- David Corenswet Superman
- Shayla Somer Gibson
- Beach Boys Members

How To Remove Security Tags From Clothes (Safely + Legally)
Banana Republic | Jackets & Coats | Banana Republic Trench Coat | Poshmark
lululemon athletica | Tops | Lululemon Movement To Movement 2 In Tank
