How To Draw Flowers: Simple Guides For Beginners To Create Beautiful Blooms Today
Learning how to draw flowers can be a truly enjoyable experience, and you know, it's actually much simpler than you might think. Many people feel a bit unsure about starting to sketch, perhaps thinking they need a special talent or a lot of expensive art supplies. But the truth is, anyone can begin making pleasing flower pictures, and it's a very rewarding way to spend some time, too.
These tutorials offer detailed instructions and with a few simple steps, you can begin to make your own lovely floral artwork. You will learn how to draw simple flowers with these step by step guides made for beginners, which, in a way, really break down the process. These illustrated tutorials are easy to follow and will help you draw beautiful roses, lillies and more, giving you a good foundation.
Whether you're new to sketching or just want to improve your flower drawings, this article is for you. All you need to get started is a pencil and paper, and perhaps, you know, a bit of enthusiasm. This guide shows how to draw a flower with a stem and a pair of leaves using examples done in a simple style, and it's pretty much all about getting started easily.
Table of Contents
- Why Learn How to Draw Flowers?
- Getting Started: What You Need
- The Basics of Flower Drawing
- Understanding Flower Parts
- Starting with Simple Shapes
- Step-by-Step Flower Tutorials
- Drawing a Rose: A Classic Bloom
- Sketching a Tulip: Elegant Simplicity
- Creating a Dandelion: Cheerful and Easy
- Capturing a Daffodil: Spring's Delight
- Making a Hydrangea: Big and Bubbly
- Drawing Snowdrops: Tiny Winter Wonders
- Apple Blossoms: Delicate Beauty
- Tips for Improving Your Flower Drawings
- Frequently Asked Questions About Flower Drawing
- Your Next Steps in Flower Art
Why Learn How to Draw Flowers?
Drawing flowers offers a wonderful way to express yourself, and it's a calm activity, you know. It lets you really look at nature, seeing the small details that make each bloom special. This kind of observation can be very relaxing, actually.
For beginners, flower drawing is a really good starting point because flowers have shapes that are often repeated, and that makes them easier to sketch. You can learn a lot about lines, curves, and shading, which are skills you can use for other types of art later on. It's a skill that builds, sort of.
Plus, you can share your drawings with others, making cards or gifts. It’s a way to connect with people, and it feels good to make something with your own hands. So, there are many good reasons to give it a try, really.
- Movies To Stream This Weekend
- Deion Sanders Kids
- Alan Jackson Health
- Elon Musk Girlfriend
- Heidi Klum Children
Getting Started: What You Need
To begin your journey into drawing flowers, you honestly don't need much. Simplicity is key here, and that's a good thing. You can get started with just a few basic items that are easy to find, you know, pretty much anywhere.
All you need to get started is a pencil and paper. A regular graphite pencil, perhaps a HB or 2B, works very well for initial sketches. You might also want an eraser, just in case you want to make changes to your lines. It's always good to have that option, right?
Some people like to have different types of paper, but any plain white paper will do the trick for practice. You could also use a small sketchbook if you want to keep all your drawings in one place. It’s about making it easy for you, basically.
The Basics of Flower Drawing
In this tutorial, you will learn the basics of how to draw flowers, which is a great place to begin. It's about breaking down the flower into simpler parts, you see. This approach makes the whole process feel much less overwhelming, which is important.
You'll get to understand their petals, buds, leaves, and stems, as well as create a variety of eight simple flower drawings. This foundation helps you see the structure of a flower before you add all the pretty details. It's like building a house, you know, you start with the frame.
This method helps you build confidence with each step, and you'll find that even complex-looking flowers can be drawn by following a few clear instructions. So, it's about building up your skills, pretty much one line at a time.
Understanding Flower Parts
Before you draw a flower, it helps to know its main parts. Every flower, more or less, has petals, which are the colorful parts. Then there's the stem, which holds the flower up, and leaves that grow from the stem. These are the main things you'll be drawing, typically.
The center of the flower, sometimes called the bud or the reproductive part, also has a shape. This central part can be a small circle, a cluster of dots, or something else entirely. It really depends on the kind of flower you are drawing, you know.
Thinking about these parts separately makes it easier to draw the whole flower. You draw each part, one by one, and then put them all together. It's a way of simplifying things, sort of, which is very helpful.
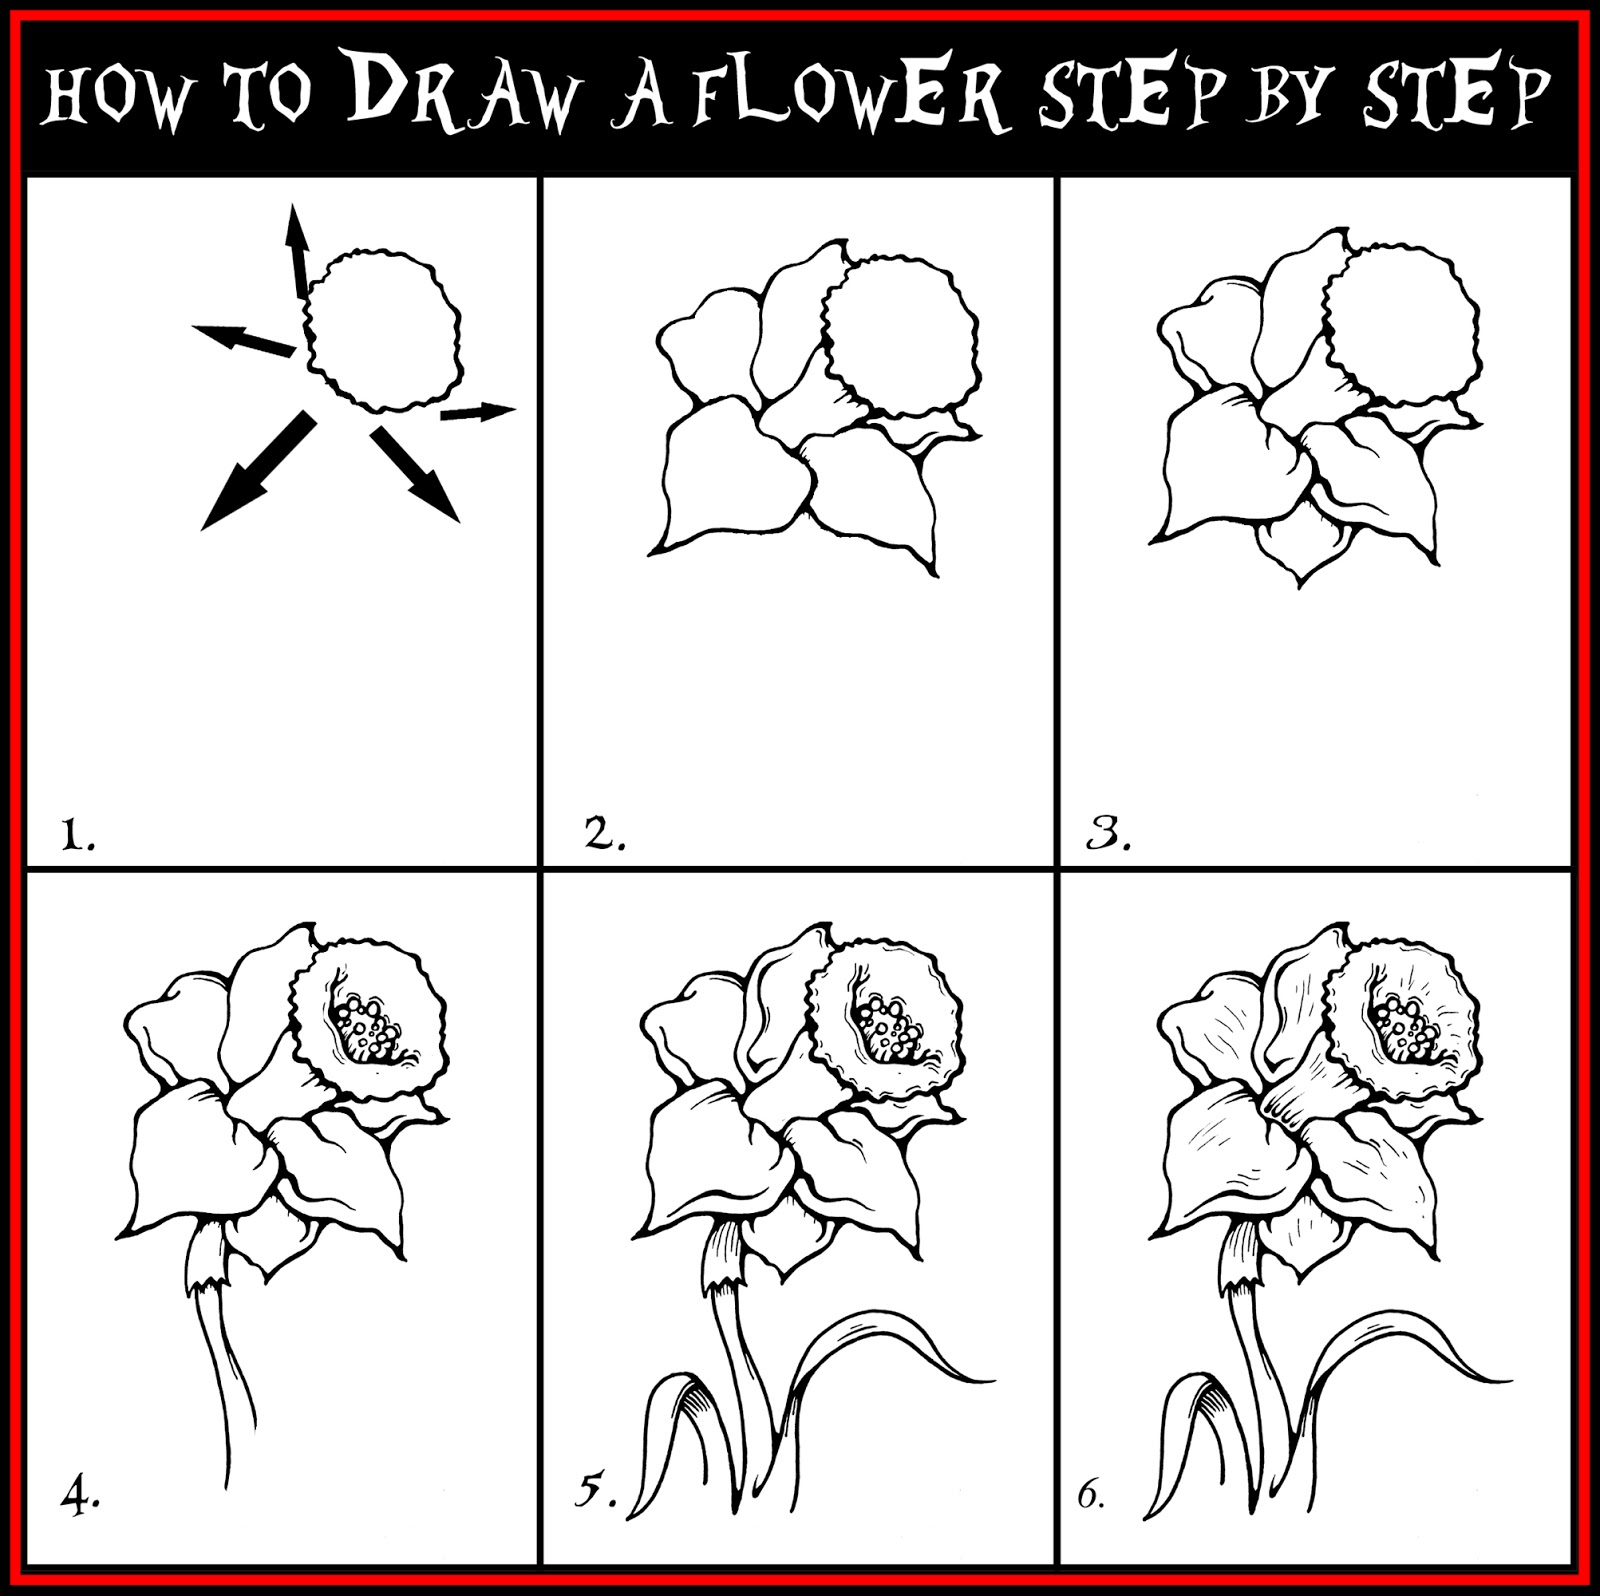
Starting with Simple Shapes
A good way to begin any flower drawing is by using simple shapes, like circles or ovals. These shapes act as guides for where your petals and other parts will go. For example, you can start with a circle for the main part of the flower, and then draw a line for the stem, actually.
This initial sketch should be done very lightly, using a pencil that makes faint marks. You don't want to press down too hard, because these lines are just there to help you place things. You'll erase them later, you know, so they're just a temporary guide.
Once you have your basic shapes, you can start to add the more detailed lines for the petals and leaves. This method helps you get the proportions right and makes sure your flower looks balanced. It's a good habit to get into, basically, for any drawing.
Step-by-Step Flower Tutorials
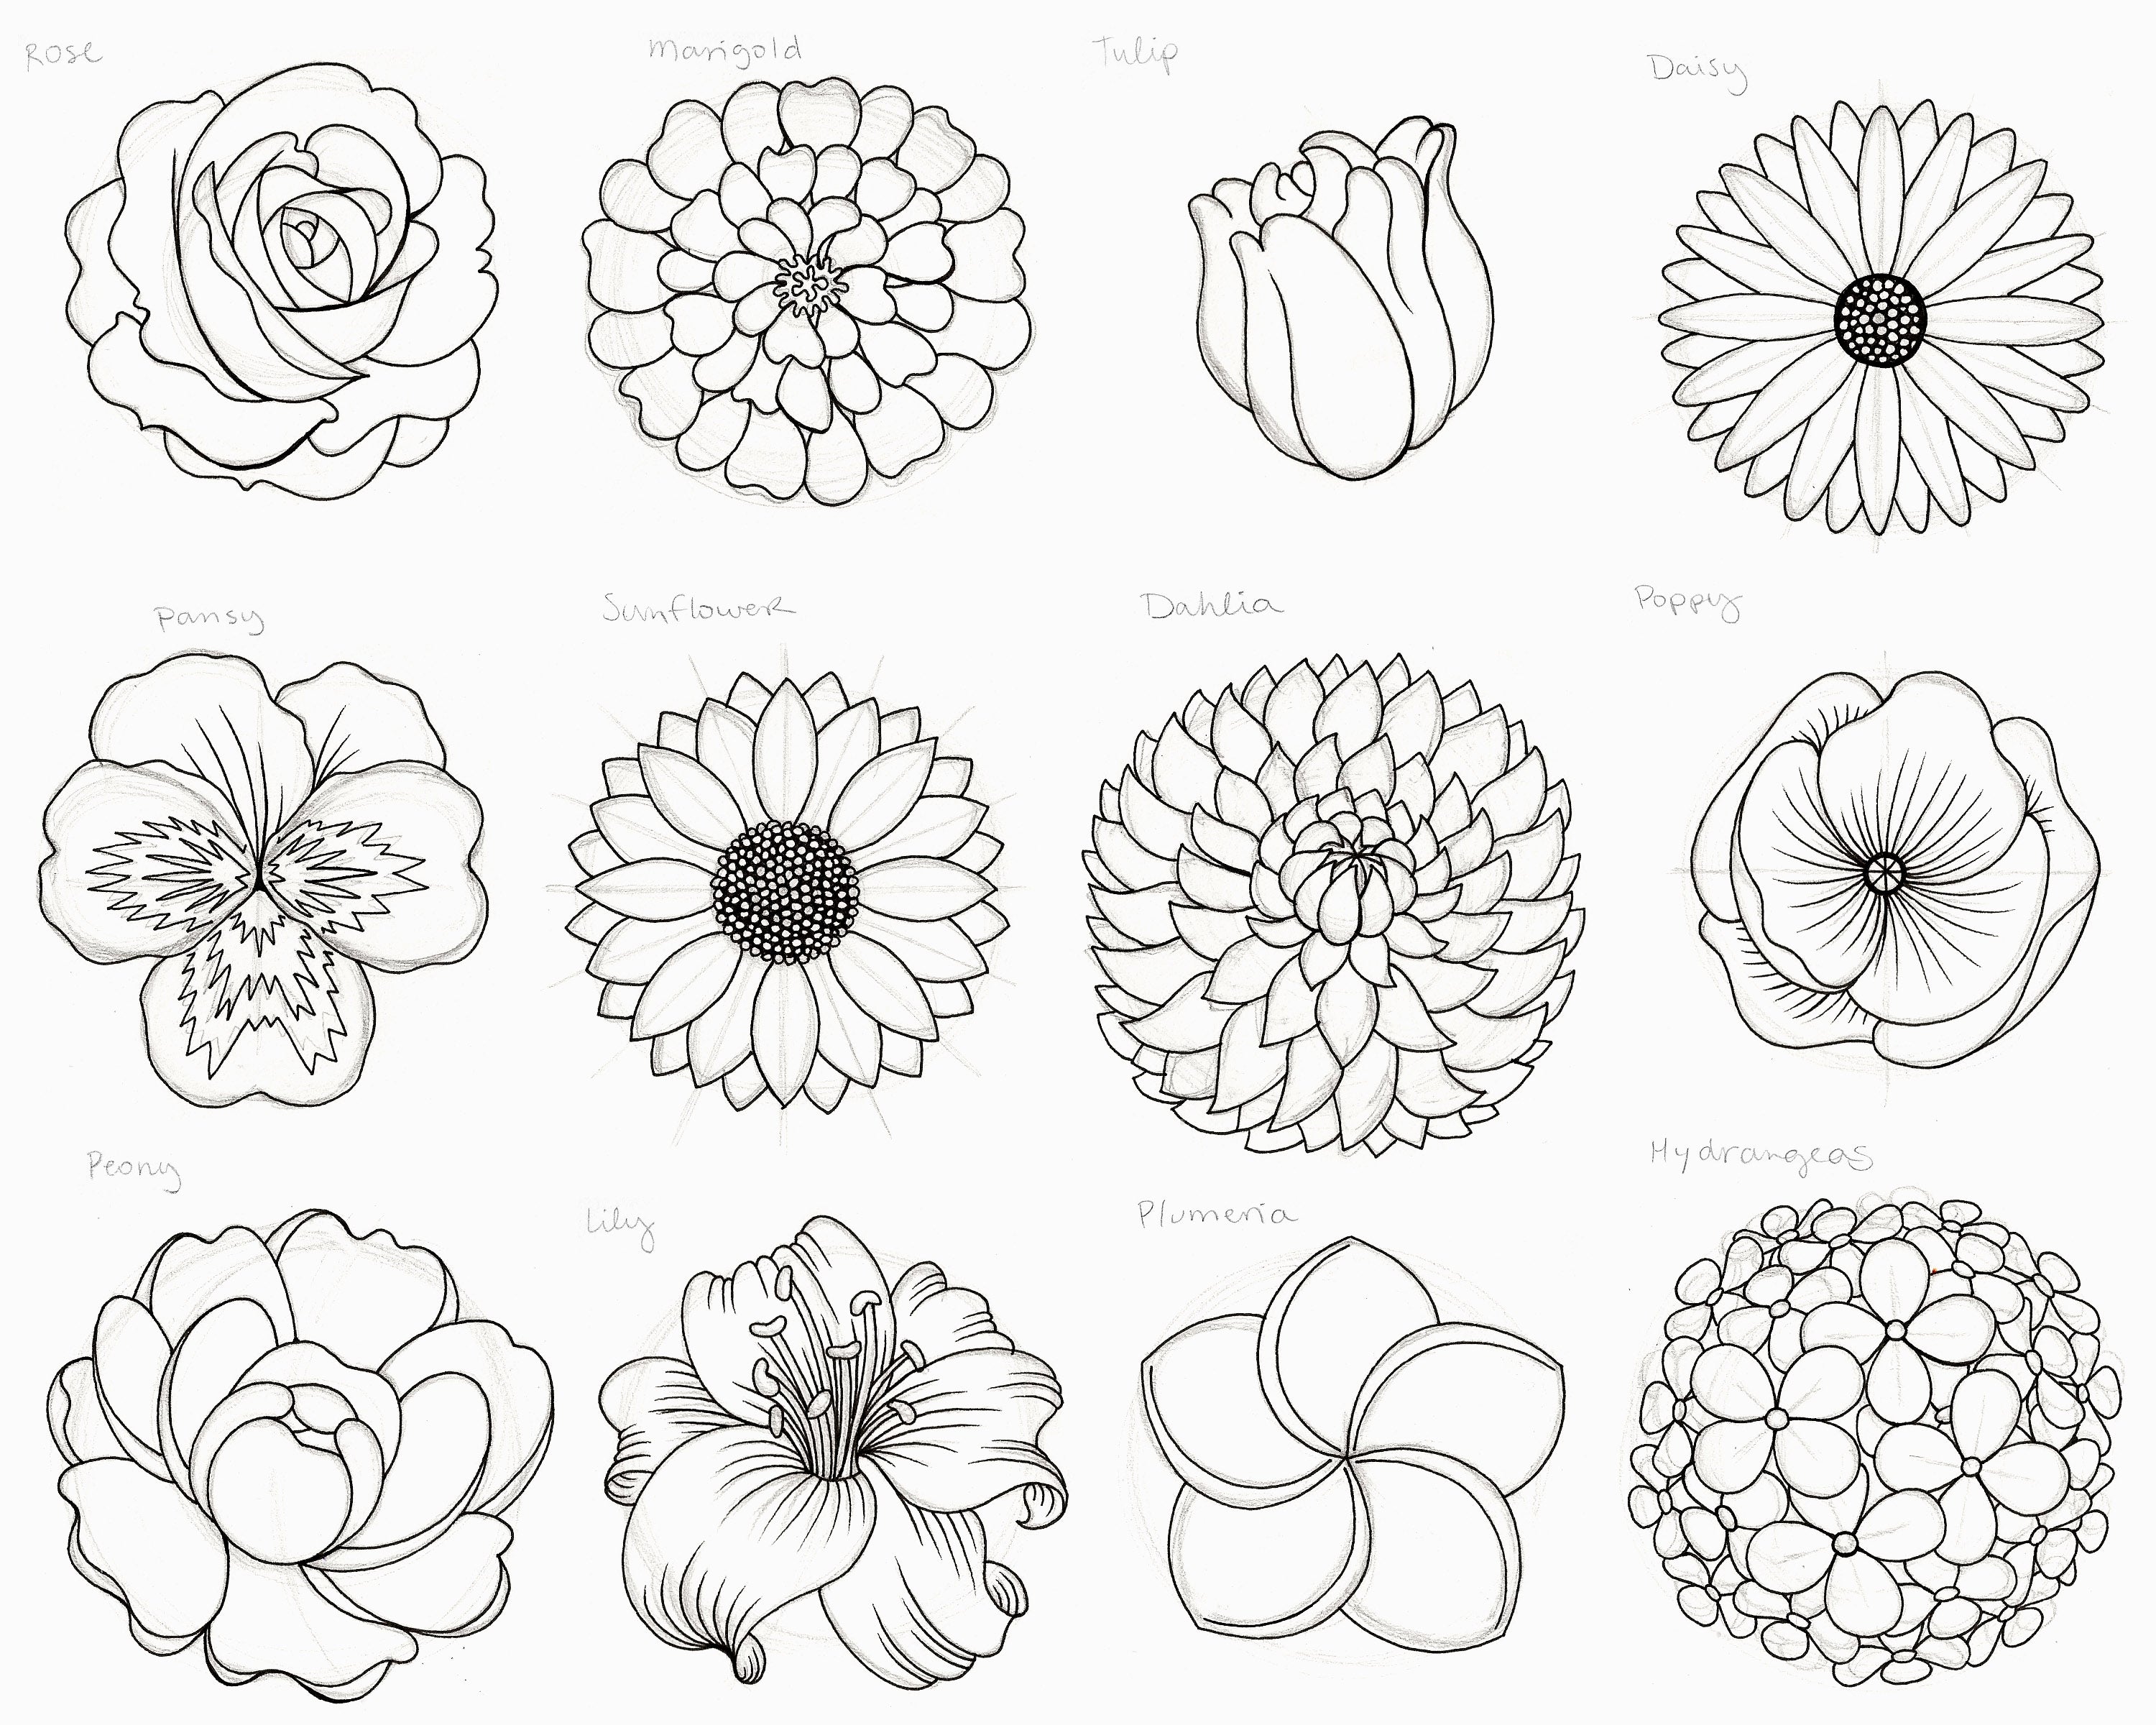
These illustrated tutorials are easy to follow and will help you draw beautiful roses, lilies, and more. We have 12 tutorials of how to do flower drawing easy with pictures step by step, so there's plenty to try. You'll find that each flower has its own unique charm, and learning to draw them is quite satisfying, you know.
Whether you’re inspired by delicate roses or the bold look of a sunflower, these guides are designed to help you. You can find ideas in this tutorial for beginners, and it's all about taking it one step at a time. We'll cover a range of popular blooms, from the everyday to the more exotic, more or less.
You can draw a rose, tulip, dandelion, and more, all with clear instructions. This section gives you practical steps for each type of flower, helping you build a collection of drawings. So, let's get started on some specific flowers, right now.
Drawing a Rose: A Classic Bloom
The rose is a very popular flower to draw, and it can seem complex, but it's not too bad. Start with a small spiral shape in the center for the tight inner petals. This spiral will be your guide, you know, for the heart of the rose.
Next, draw curved lines around that spiral, making them look like overlapping petals. Think of them as C-shapes or U-shapes that get bigger as you move outwards. You want to make them flow, sort of, around the center.
Then, add larger, more open petals around the outside, making the rose look full. Don't forget to add a stem and some leaves with serrated edges. You can also add some small thorns to the stem, if you like, for a bit more detail, basically.
Sketching a Tulip: Elegant Simplicity
Tulips are pretty simple to draw because they have a very distinct shape. Begin by drawing an oval or a slightly rounded U-shape for the main body of the flower. This will be the basic outline, you know, of the bloom itself.
Inside this shape, draw three or four petals that curve upwards from the base. Tulips often have petals that are quite smooth and don't overlap too much, so keep that in mind. They are, in a way, quite sleek.
Add a straight stem coming down from the bottom of the flower. Then, draw one or two long, wide leaves that emerge from the base of the stem. Tulips typically have leaves that are quite plain and wrap around the stem, so keep that in mind, too.
Creating a Dandelion: Cheerful and Easy
Dandelions are very easy and fun to draw, and they are quite recognizable. Start with a small circle for the center of the flower. This circle will be the base for all the little petals, you know, that make up the head.
Around this circle, draw many short, straight lines radiating outwards. These lines represent the thin petals of the dandelion. You want to make them look a bit messy and uneven, which is how dandelions usually appear, pretty much.
Add a long, thin stem that goes straight down from the flower. Dandelions have very simple leaves that often have jagged edges, so you can draw a few of those near the base of the stem. They are, after all, quite common, so you've likely seen them.
Capturing a Daffodil: Spring's Delight
Daffodils have a unique shape, with a trumpet-like center. Begin by drawing a larger circle for the main petals and a smaller circle inside it for the trumpet part. This gives you the two main sections, you know, to work with.
Around the larger circle, draw six petals that are somewhat pointed and spread out. These petals should be fairly even in size and shape. They are, in some respects, quite symmetrical.
For the trumpet, draw a ruffled edge around the inner circle, making it look like a cup. Then, add a long, sturdy stem and a few long, thin leaves that come up from the ground. Daffodils usually have leaves that are quite narrow, so keep that in mind, too.
Making a Hydrangea: Big and Bubbly
Hydrangeas are made up of many small flowers clustered together, which can seem tricky, but it's not. Start by drawing a large, rounded shape, perhaps a big circle or an oval, for the whole cluster. This will be the overall form, you know, of the flower head.
Inside this large shape, draw many small circles or squares with rounded corners. These represent the individual tiny flowers. You don't need to draw every single one perfectly; just suggest them, in a way, with lots of little shapes.
Add a thick stem to support the heavy cluster of blooms. Hydrangea leaves are usually quite large and have a somewhat textured look, so you can add a few of those. It's about giving the impression of fullness, basically, with all those small parts.
Drawing Snowdrops: Tiny Winter Wonders
Snowdrops are delicate and simple, often appearing in late winter. Start by drawing a small, bell-like shape hanging downwards for the flower head. It's like a tiny drop, you know, hanging from a thin stem.
Inside this bell shape, draw three outer petals that are somewhat long and narrow, and then three smaller, inner petals that might have a little green marking. These petals are quite distinct, so pay a little attention to their shape, perhaps.
Draw a very thin, slightly curved stem. Snowdrops typically have two very narrow, blade-like leaves that come up from the ground alongside the stem. They are, in a way, quite minimalist in their design.
Apple Blossoms: Delicate Beauty
Apple blossoms are small, five-petaled flowers, often with a hint of pink. Begin by drawing a small circle for the overall size of the flower. This will help you place the petals, you know, in the right spot.
Draw five rounded petals that overlap slightly, coming out from the center. These petals are usually quite soft-looking. You can add a small dot in the center for the stamens, and perhaps a few tiny lines radiating from it, too.
Apple blossoms grow in clusters, so you might draw a few together on a small branch. The leaves are typically oval-shaped with a slightly pointed tip. They are, in some respects, a very sweet and simple flower to draw, especially for spring scenes.
Tips for Improving Your Flower Drawings
To make your flower drawings even better, there are a few things you can keep in mind. One good idea is to look at real flowers, or pictures of them, to understand their shapes and how their petals fold. This helps you draw them more accurately, you know, and gives your drawings a sense of realness.
Practice often, even if it's just for a few minutes each day. The more you draw, the more comfortable your hand will become with making different lines and curves. It's like any skill, you know, it gets better with repetition, basically.
Experiment with different pencil pressures to create lighter and darker lines. This can add depth and dimension to your flowers, making them look less flat. You can also try shading to show where light hits the petals and where shadows fall. This adds a lot of character, sort of, to your art. Learn more about drawing techniques on our site.
Don't be afraid to make mistakes; they are part of the learning process. Each "mistake" is a chance to learn something new about how you draw. Just keep going, and you'll see improvement over time, honestly. You can always check out more of our art guides for extra help.
Frequently Asked Questions About Flower Drawing
How do you draw a simple flower?
To draw a simple flower, you typically start with a basic shape, like a circle or an oval, for the main part of the bloom. Then, you add simple petal shapes around that center, perhaps just five or six rounded petals. After that, you draw a stem and a couple of leaves. It's about breaking it down, you know, into very manageable parts.
What is the easiest flower to draw?
Many people find the dandelion or a simple daisy to be the easiest flowers to draw. They both start with a clear central circle, and then you just add many short, straight lines for the dandelion's petals, or simple, rounded petals for the daisy. They don't have complex overlapping petals, which makes them quite straightforward, you see.
How do you draw a pretty flower step by step?
Drawing a flower that looks pleasing step by step involves starting with light sketch lines for the overall shape and proportions. Then, you build up the petals, one by one, paying attention to their curves and how they connect. Add details like veins on leaves and shading to give it depth. It's a gradual process, basically, where each step adds to the final look.
Your Next Steps in Flower Art
Now that you have a good starting point for how to draw flowers, you can keep practicing with the different types we talked about. Remember, the key is to enjoy the process and to keep your pencil moving. You'll find that with each flower you draw, you gain a little more skill and confidence, you know, which is really what it's all about.
Consider looking at more drawing resources, perhaps even videos, to see different artists at work. There are many ways to approach drawing, and seeing various styles can inspire your own. You could, for instance, visit a site like Art-Is-Fun.com for more ideas and tips, which is a good place to start, too.
Keep a sketchbook handy so you can draw whenever inspiration strikes, and don't be afraid to try drawing flowers from real life. Observing a flower directly can teach you things that pictures cannot. It's a very personal journey, in a way, and every line you draw adds to your unique style. Happy drawing, you know, and have fun with it!
- Kat Timpf Husband
- Chris Farley Passed Away
- Taj Monroe Tallarico
- Nakoa Wolf Manakauapo Namakaeha Momoa
- Alexis Sofia Cuban

How To Draw A Flower
DARYL HOBSON ARTWORK: How To Draw A Flower Step By Step Drawing Guide
How To Draw A Flower Step By Step For Beginners
